RTView DataServer for TIBCO Quick Start Guide, Version 5.3
This document describes how to download and install the RTView DataServer for TIBCO for use with Enterprise Monitor, how to configure the data server including defining the connection information for each solution package (TIBCO Enterprise Message Service, TIBCO ActiveMatrix BusinessWorks, and so on), how to add alert and historian database connections, how to add connections to Enterprise Monitor, and how to verify that your setup is working properly in Enterprise Monitor.
Note: For information regarding the overall RTView DataServer architecture as well as how to set up security for the related RTView processes, see DataServer and DataCollector Architecture for RTView Enterprise Monitor.
Note: This flow assumes that you have already downloaded, installed, and have RTView Central Servers (Enterprise Monitor) up and running. See the RTView Enterprise Monitor Configuration Guide for more information.
Note: If you are interested in setting up High Availability (failover) for your DataServer, review Configuring High Availability for DataServer Deliverables prior to starting this flow.
Note: In addition to using the RTView Configuration Application for configuring your TIBCO Enterprise Message Service connections, you can use the Property Editor REST API to import initial connections or automate connection updates. See Property Editor REST API for more information.
Before You Get Started
- You must have Java installed and you should know the installation directory path.
- You should know the correct full path to the directory containing the TIBCO jar files for each of your solution packages.
- You should know the connection settings for your solution packages:
TIBCO ActiveMatrix connections: Connection Name, URL, and Username/Password.
TIBCO ActiveSpaces connections: FTL connections.
TIBCO ActiveSpaces2 connections: Metaspace to be monitored, Domain Name, Space(s) to be monitored, Discovery URL, Listen URL, Security Token File, and Identity Password.
TIBCO Enterprise Message Service (EMSMON) connections: URLs for the EMS servers you want to monitor.
TIBCO BusinessWorks (BWMON) connections: You can either install the OSGi plugin in every AppSpace you want to monitor, or you can enable the TIBCO Hawk MicroAgent in each AppSpace you want to monitor.
TIBCO BusinessWorks Version 5 (BWMON5) connections: BWMON5 monitoring must be done via TIBCO Hawk, which is enabled by default, but you also need to install the RTViewBWAgent plug-in microagent. If you enable JMX monitoring, you can access additional data such as CPU and Memory data. For BWSE engines, additional setup is needed to allow access to AMX Node data.
TIBCO Hawk connections (for BWMON and BWMON5): Where Transport Type is EMS: Domain, Username/Password, and Agent(s). Where Transport Type is Rendezvous: Domain, Service, Network, Daemon, and Agent(s).
RTView Manager connections (BWMON5 only): Name, Port, and Username/Password.
TIBCO Adapters connections: Domain Name, Agent Name, and Method of Transport (EMS or Rendezvous).
TIBCO BusinessEvents connections: Engine Name, Host, TCP Port Number, BusinessEvents Engine Type, BusinessEvents Version for the engine, and Cluster Name where the engine resides.
TIBCO FTL connections: Primary URL for Connection, Failover URL for Connection, Number of Primary Cores, Number of Backup Cores, and Username/Password.
- If you are upgrading to a new version of the DataServer, review the Upgrade Steps document to see if there are any additional steps required.
Downloading the RTView DataServer for TIBCO
Open a browser and navigate to https://sl.flexnetoperations.com.
- Login using your RTView Download Center account login/password.
If you do not have an RTView Download Center account, contact sl@flexnetoperations.com about helping you to create an account.
The RTView Download Center page displays.
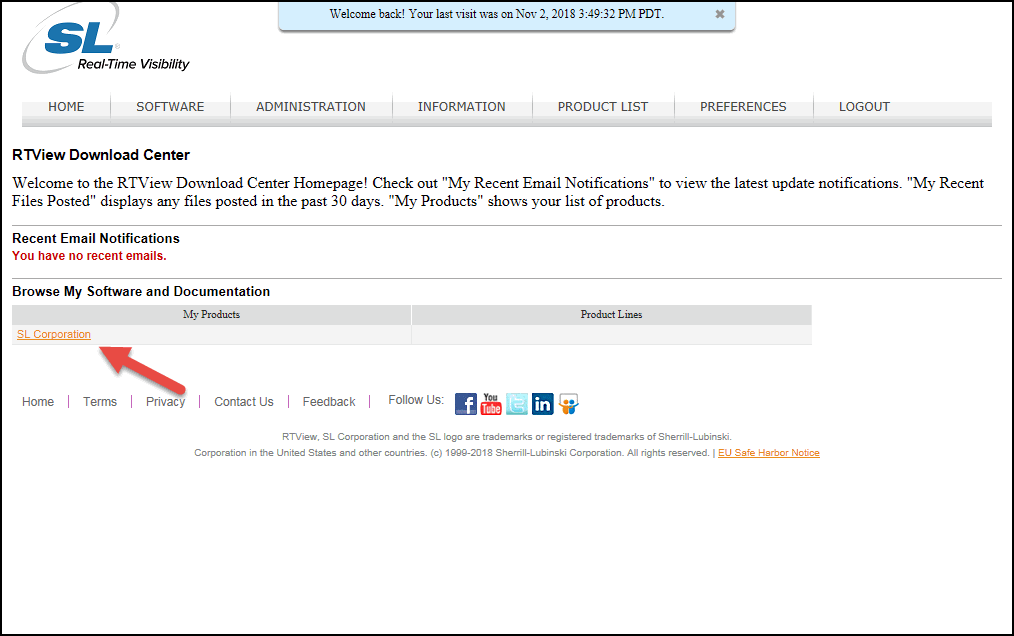
- Click the SL Corporation link in the Browse My Software and Documentation region.
The list of available Product Lines displays.
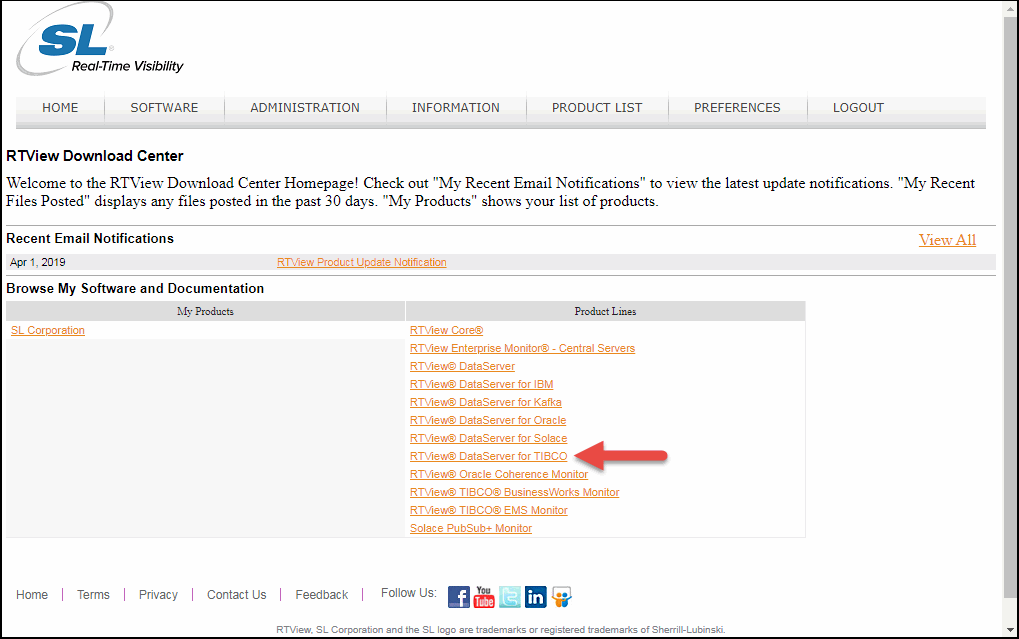
Click RTView DataServer for TIBCO.
The Product Information page displays.
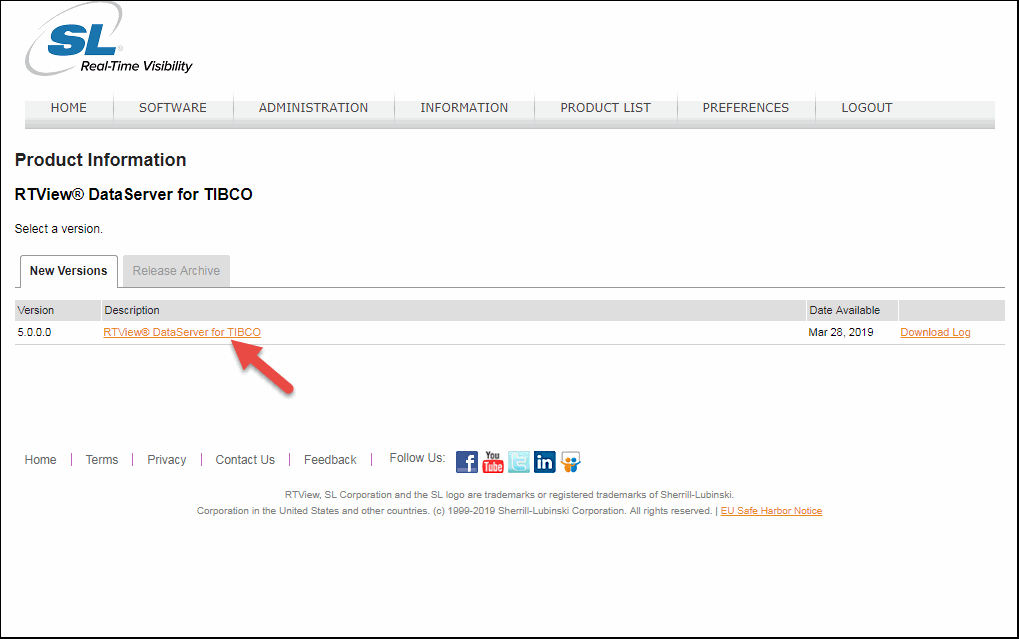
Click RTView DataServer for TIBCO.
The Product Download page displays.
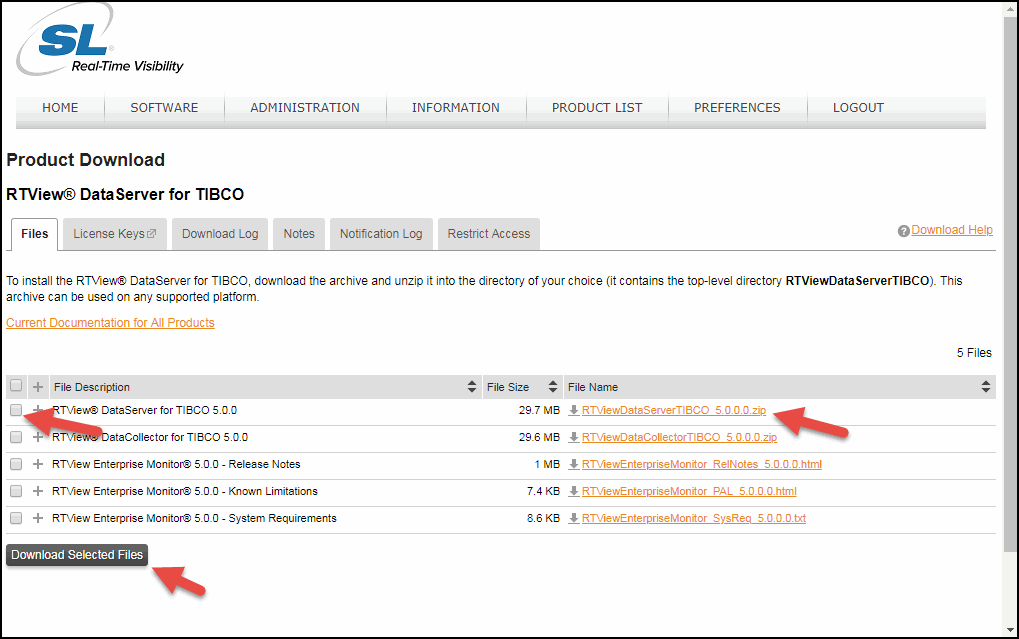
Click the RTViewDataServerTIBCO_<version>.zip file or, if you want to download multiple files, select the check box next to the different deliverables and click the Download Selected Files button.
The compressed file(s) is/are saved to your machine.
Registration
When you install the DataServer, a temporary license key is included. SL Corporation will send you a permanent key that you will need to add to your RTView license key file so that you can extend the operation of your monitoring system.
This is a universal key that will enable you to run RTView on different machines and platforms. It is your responsibility to ensure you use RTView within the terms of your End User License Agreement (EULA).
To update your RTView system with your new license key, open a command window and:
- Navigate to RTViewDataServerTIBCO/rtvapm/rtview/lib.
- Edit the KEYS file using a text editor.
- Copy/paste the new replacement key to the file.
- Save the KEYS file.
Installing and Starting the RTView DataServer for TIBCO
Note: If using UNIX, do not include spaces in your installation directory path. The start_server.sh and stop_server.sh scripts will not function properly if spaces are included in the installation directory path.
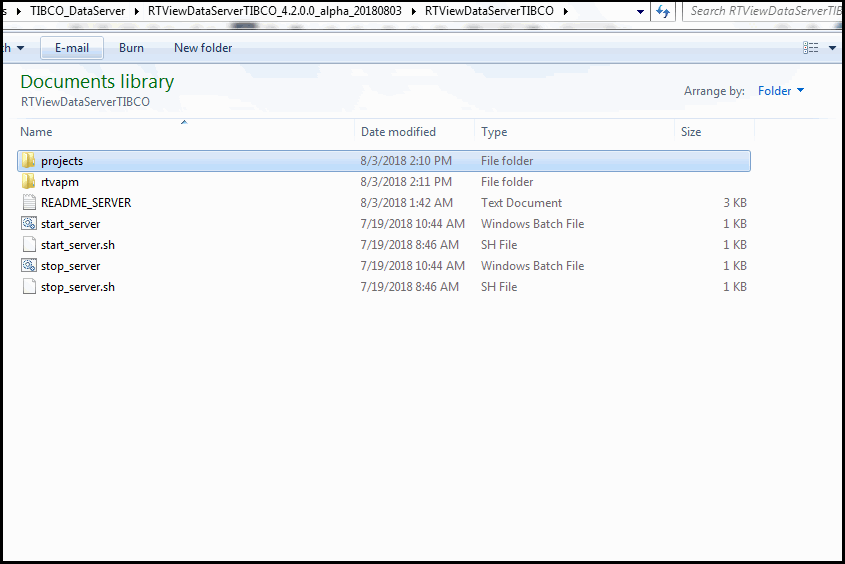
Extract All (Windows)/unzip (UNIX/Linux) the file to the directory of your choice. For UNIX/Linux, use unzip -a to unzip the file.
Open a command window and set the JAVA_HOME environment variable to point to your Java Installation. For example:
export JAVA_HOME=/opt/Java/jdk1.7.0 (UNIX/Linux)
set JAVA_HOME=C:\Program Files (x86)\Java\jre1.8.0_201 (Windows)
Or, in Windows, you can set JAVA_HOME as an environment variable (in Control Panel > System >Advanced system settings), where it will then be used by all command windows and when you double-click on a .bat file.
- In the command window, navigate to the RTViewDataServerTIBCO directory and type:
start_server.bat (Windows)
./start_server.sh (UNIX/Linux)

Configuring the Data Server
Next, you need to specify the directory path to your TIBCO .jar files and you need to create your connections for the each of your solution packages using the RTView Configuration Application.
- Open a browser and type:
http://localhost:3270/rtvadmin
The Authentication required dialog displays.
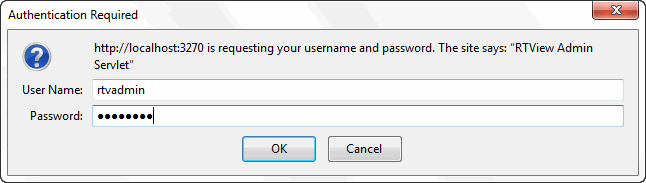
- Log in using rtvadmin/rtvadmin as the username/password.
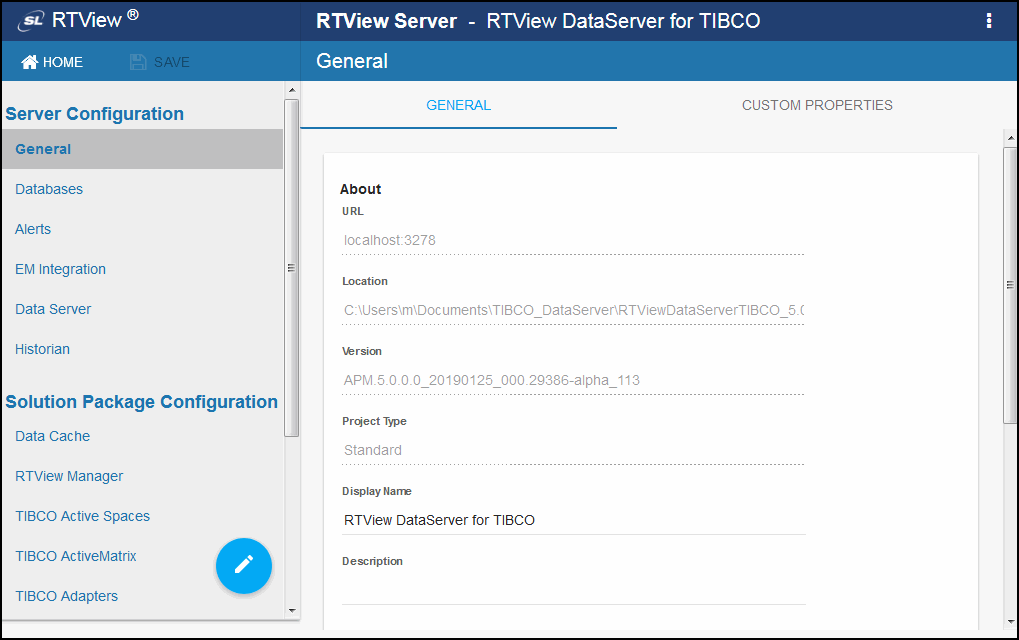
The RTView Configuration Application displays.

- Click RTView DataServer for TIBCO.
The RTView Configuration Application displays with the General tab open.
- As previously mentioned, if you modified the port at startup, you should modify the port prefix so that you do not need to specify the port on the command line every time you run the startup script. To do so, navigate to Server Configuration > General > General Tab > Ports > Port Prefix and define a new port prefix. If you change the Port Prefix to 44 then, after saving your changes and restarting your data server, you would access the RTView Configuration Application for the RTView DataServer for Infrastructure using the following URL: http(s)://localhost:4470/rtvadmin (instead of the default http(s)://localhost:3270/rtvadmin URL)
- Under Solution Package Configuration, select the desired solution package you want to configure and click the link below to view the steps required to set up the configuration for the solution package:
TIBCO BusinessWorks – Contains configurations required for TIBCO ActiveMatrix BusinessWorks Versions 5 and 6, TIBCO Hawk (for Versions 5 and 6), and RTView Manager (required for Version 5 if JMX is enabled).
TIBCO Enterprise Message Service
- Optionally, you can create a Historian Database Connection and configure the historian settings. See the link below for more information:
Configuring the Historian Database (Optional)
- Alerts are configured in RTView Central Server. Click the link below to view details, and see the RTView Enterprise Monitor Configuration Guide for more information.
Connecting Your Data Server to Enterprise Monitor
Next, you need to connect your data server to Enterprise Monitor (RTView Central). To do so:
- Click Server Configuration > EM Integration.
The EM INTEGRATION tab displays.
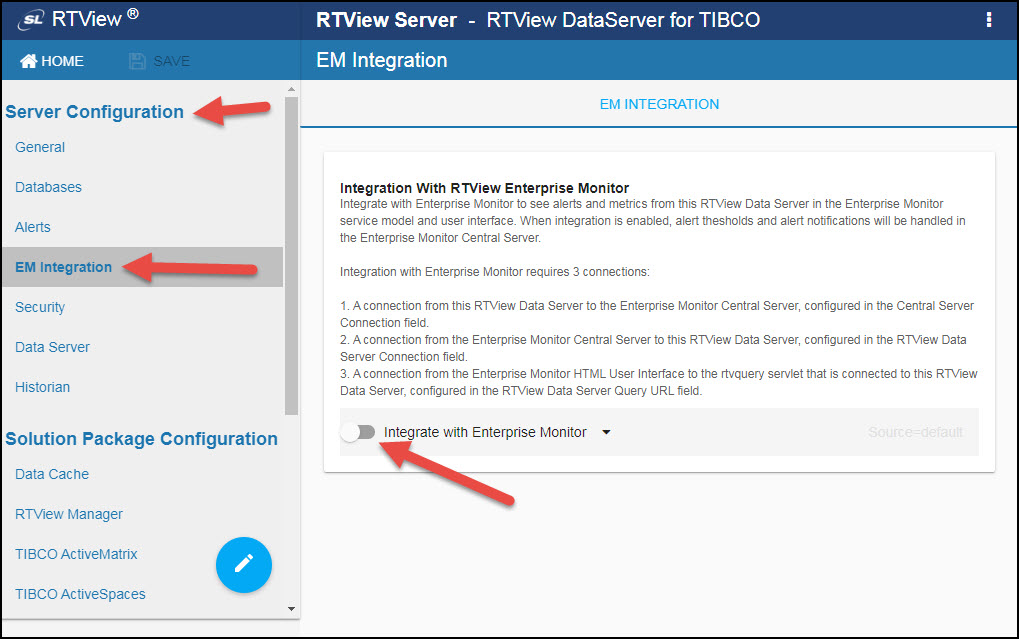
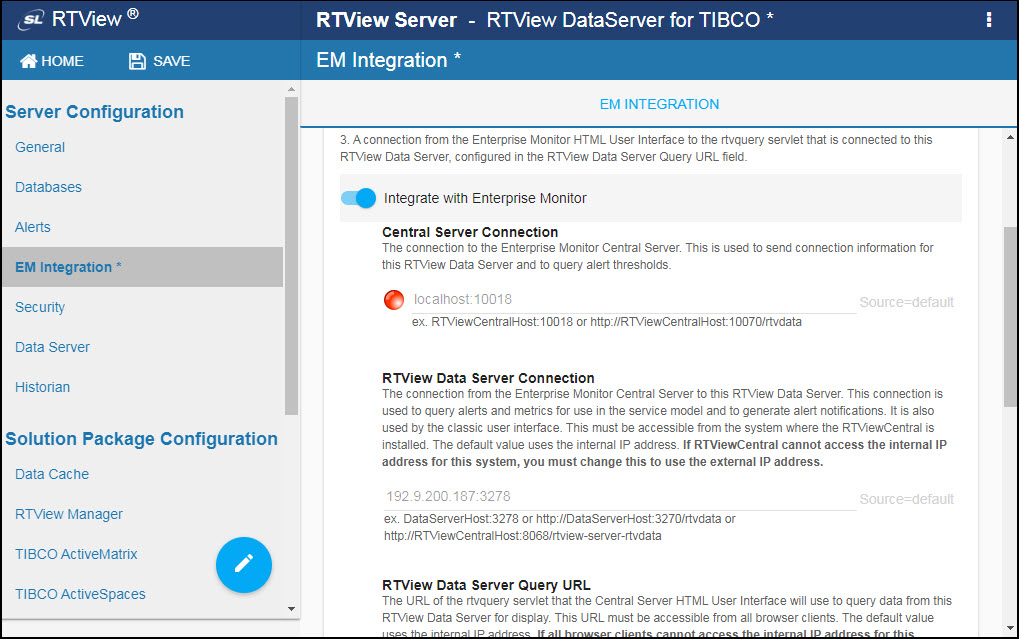
- Click the Integrate with Enterprise Monitor toggle.
Note: This field can be enabled by default by setting the RTVDS_INTEGRATEENABLED environment variable to 1 (for example: RTVDS_INTEGRATEENABLED=1).
The following fields display:
Central Server Connection: Specify the URL to be used to connect to your RTView Enterprise Monitor Central Server. By default, a local connection is defined (localhost:10018) and does not need to be modified if your Central Server and Data Server are on the same machine. If they are on different machines, enter the URL containing IP address and port like so:
<IP address>:10018
Note: You can specify a different default for the Central Server Connection field by specifying the RTVDS_CENTRALURL environment variable (for example: RTVDS_CENTRALURL=RTViewCentralHost:10018.
RTView Data Server Connection: Specify the URL that the RTView Enterprise Monitor Central Server should use for connecting to this RTView Data Server. The default value is the internal IP address. If the Central Server cannot access the internal IP address, then you must modify this value to use the external IP address. This field can be defined by default by defining the RTVDS_URL environment variable (for example: RTVDS_URL=myhost:3278).
RTView Data Server Query URL: Specify the URL that the RTView Central Server HTML user interface should use to query data from this RTView Data Server. The default value uses the internal IP address. If all browser clients cannot access the internal IP address for this system, you must change this value to use the external IP address or deploy the rtvquery servlet to an application server on an accessible system and you should specify that value in this field. This field can be defined by default by defining the RTVDS_QUERYURL environment variable (for example: RTVDS_QUERYURL=http://myhost:3270/rtvquery).
RTView Data Server Name: Define the name of the data server that you want to display in Enterprise Monitor. Modifying the default name in this field is optional. However, for our example, enter TIBCO_Data_Server so that we can verify our change in our verification section later in this document. This field can be defined by default by defining the RTVDS_NAME evironment variable (for example: RTVDS_NAME=EMSMON_LOCAL). Note: You can only enter alphanumeric characters, underbars, and dashes in the data server name.
CITypes to Exclude: The CI Types, if any, that you want to exclude from the Service Model in the Central Server. If not specified, all CI Types for the configured solution packages are included in the Service Model. To select the CI Types you want to exclude, click the associated  button to display the CI Types to Exclude dialog, select the desired CI Types, and click OK. This field can be defined by default by defining the RTVDS_CITYPESTOEXCLUDE environment variable (for example: RTVDS_CITYPESTOEXCLUDE=BW-ACTIVITIES,BW-PROCESSES).
Send Connection Information To Enterprise Monitor: By default, the associated Announce this RTView Data Server to the Central Server toggle is selected, which will automatically connect the data server to RTView Central. If you do not want to automatically connect the data server to RTView Central, deselect this toggle. If deselected, you must define the connection from RTView Central to this data server in the RTView Central Configuration Application.
Note: This field can be enabled by default by setting the RTVDS_ANNUNCIATEENABLED environment variable to 1 (for example: RTVDS_ANNUNCIATEENABLED=1).
Saving and Restarting Your Data Server
- Once you have created all of your connections, click the SAVE button in the RTView Configuration Application.

- For your changes to go into effect, you must stop and restart the data server by either:
- clicking the
 button (in the upper right-hand corner of the window)...
- clicking the
- or by typing the following in your installation directory in the command window:
stop_server.bat (Windows)
./stop_server.sh (UNIX/Linux)
start_server.bat (Windows)
./start_server.sh (UNIX/Linux)
Verifying Your Setup
To verify your setup:
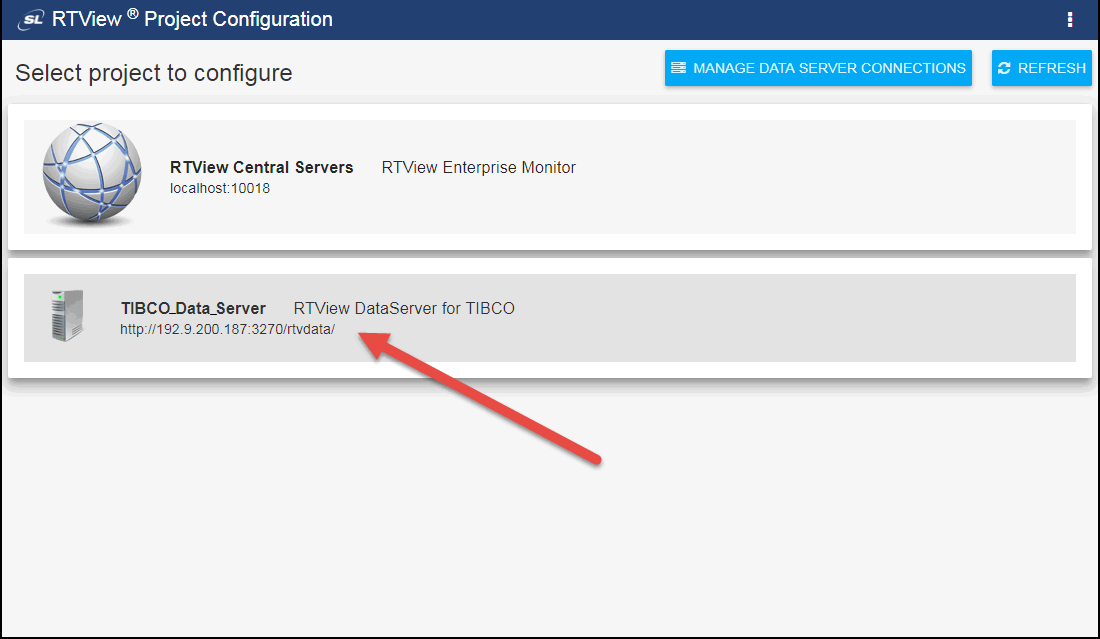
- Open a browser, access the RTView Configuration Application for RTView Central Servers (Enterprise Monitor) using http://localhost:10070/rtview-central-rtvadmin, and log in using rtvadmin/rtvadmin as the username/password.
Your data server (TIBCO_Data_Server, for our example) displays in the list below RTView Central Servers. You can edit your data server connections/configurations in the RTView Configuration Application for RTView Central (http://localhost:10070/rtview-central-rtvadmin) or in the RTView Configuration Application for the RTView DataServer for TIBCO deliverable (http://localhost:3270/rtvadmin).
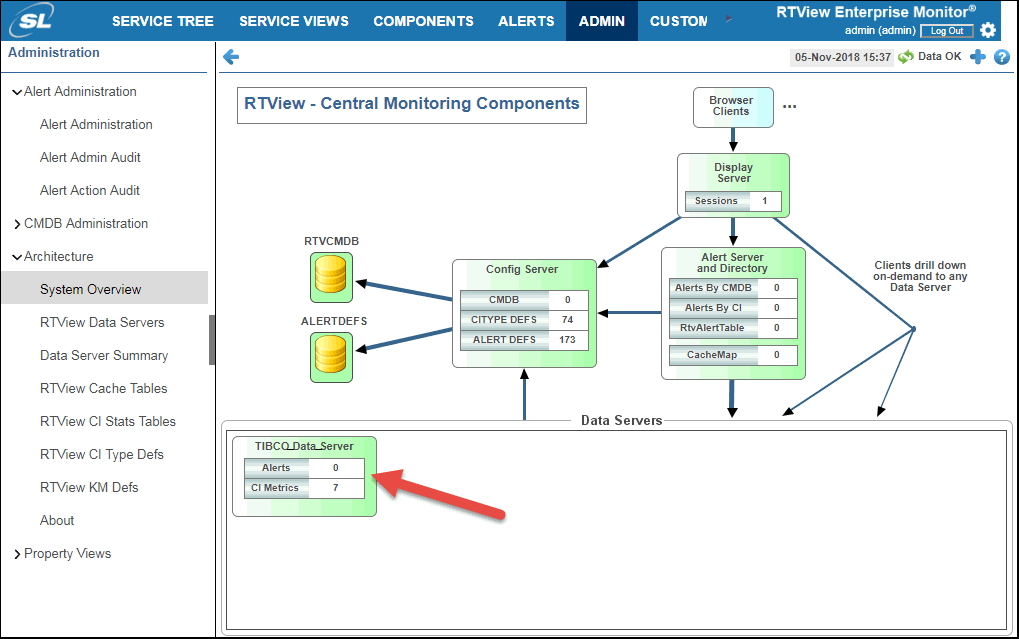
- Open a browser, access Enterprise Monitor (for example, http://localhost:10070/rtview-central-classic), and log in using admin/admin as the username/password.
- Click Admin > Architecture > System Overview and check to make sure that your newly connected data server (TIBCO_Data_Server in our example) displays in the Data Servers region and that CI Metrics are being collected.
- You can also check the incoming data in your caches by opening a browser and accessing the following URL:
http(s)://localhost:3270/common
The RTView Cache Viewer application displays, which allows you to view the details for the caches that are collecting data.
