Configuring Alerts for RTView Cloud, Version 5.0 (Optional)
Optionally, you can configure an alert threshold database connection, enable alerts and modify default alert notification settings, enable alert persistence to save the alerts to the database, store alert history to a history database, and define a history table name prefix to help differentiate alert history data between multiple data servers.
Before You Get Started
- You need to know the URL, driver, and classpath to be used for the alert database connection.
- If configured, you need to know Username/Password for your connection (if configured).
Defining an Alert Threshold Database Connection
Perform the following steps to create an Alert Threshold Database connection:
- Navigate to the RTView Configuration Application > Server Configuration > Databases > Connections tab.

- Click the "pencil" icon inside the Alert Threshold Database Connection region.
The Edit Connection window displays.
Note: You can click on the Copy to clipboard and Paste links below the "edit box" prior to creating the connection to automatically include the default text into the window.
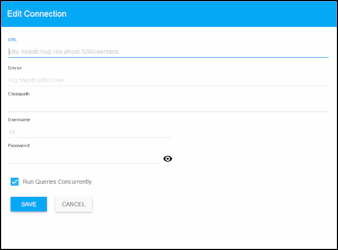
- Add the following connection details and click SAVE where:
URL: The complete URL for the database connection.
Driver: The full name for the driver.
Classpath: The complete classpath for the jar location.
Username: The username is used when creating the connection. This field is optional.
Password: This password is used when creating the connection. This field is optional. By default, the password entered is hidden. Click the ![]() icon to view the password text.
icon to view the password text.
Run Queries Concurrently: When selected, database queries are run concurrently.
Modify Default Alert Notification Settings
The following settings determine whether or not alerts are enabled and when alert notifications are sent.
To modify the default alert notification settings:
- Navigate to the RTView Configuration Application > Server Configuration > Alerts > Alerts tab > Notifications region.
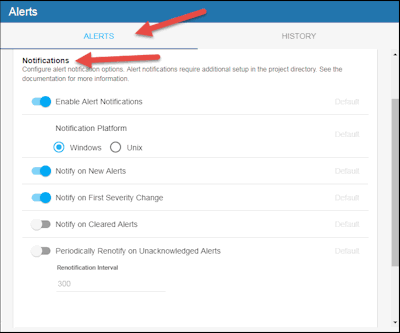
- Adjust the default settings as required and click SAVE where:
Enable Alert Notifications: Selecting this toggle enables alert notifications to be sent. Select the Notification Platform, with the options being either Windows or Unix.
Notify on New Alerts: When selected, your action will be executed every time a new alert is created. Note: You must copy common/bin/my_alert_actions.bat/.sh to your project directory in order for this setting to work.
Notify on First Severity Change: When selected, your action will be executed the first time the severity changes for each alert. Note: You must copy common/bin/my_alert_actions.bat/.sh to your project directory in order for this setting to work.
Notify on Cleared Alerts: When selected, your action will be executed every time an alert is cleared. Note: You must copy common/bin/my_alert_actions.bat/.sh to your project directory and rename it to my_alert_actions.cleared. bat/.sh in order for this setting to work.
Periodically Renotify on Unacknowledged Alerts: When selected, your action will be executed on the Renotification Interval (in seconds) for each unacknowledged alert. Note: You must copy common/bin/my_alert_actions.bat/.sh to your project directory and rename it to my_alert_actions.renotify. bat/.sh in order for this setting to work.
- Verify that the my_alert_actions.sh script has execute permissions.
- For each of the my_alert_actions script files that you just created, edit the example shown at the bottom of the script (# Add custom processing for email, file, etc.) that causes the email to be sent.
Note:The syntax and commands used to format and send emails will depend on which mail service is available in your environment. Contact your mail administrator before starting this process.
Example mail commands
Example: Mailgun
curl -v -s --user api:key-fbbb5b150de9caa04655c6097cd50324 https://api.mailgun.net/v3/yourCompany.com/messages -F from=alerts@yourSendingemail.com -F to=yourRecieversEmail@yourComp.com -F subject="RTV ALERT-$ALERTNAME $ALERTINDEX" -F text="Alert Name=$ALERTNAME" -F text="Component Affected=$ALERTINDEX" -F text="Alert Identifier=$ALERTID"-F text="Alert Description=$ALERTTEXT" -F text="AlertSeverity=$ALERTSEVERITY"
Example: Mail-s
echo "DOMAINNAME=$DOMAINNAME, ALERTNAME=$ALERTNAME, ALERTINDEX=$ALERTINDEX, ALERTTEXT=$ALERTTEXT, ALERTID=$ALERTID, ALERTSEVERITY=$ALERTSEVERITY Thanks-IFS TIBCO ADMIN" | mail -s "RTV ALERT-$ALERTNAME" distributionlist@domain.com -c mail.receiver@domain.com -- -f from@domain.com
printf "DOMAINNAME=$DOMAINNAME\n ALERTNAME=$ALERTNAME\n ALERTINDEX=$ALERTINDEX\n ALERTTEXT=$ALERTTEXT\n ALERTID=$ALERTID\n ALERTSEVERITY=$ALERTSEVERITY TIBCO ADMIN" | mail -s "RTV ALERT-$ALERTNAME" support@domain.com -- -f forward@domain.com
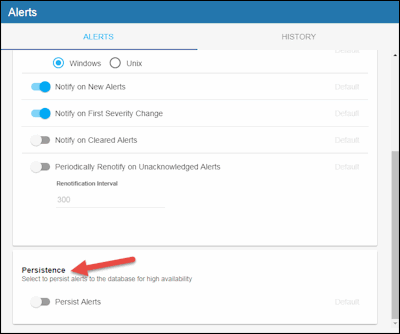
Enabling Alert Persistence
The Persist Alerts option saves the alerts to the database for high availability purposes.
To enable the Persist Alerts option:
- Navigate to the RTView Configuration Application > Server Configuration > Alerts > Alerts tab > Persistence region.
- Select the Persist Alerts toggle (blue is enabled, gray is disabled).
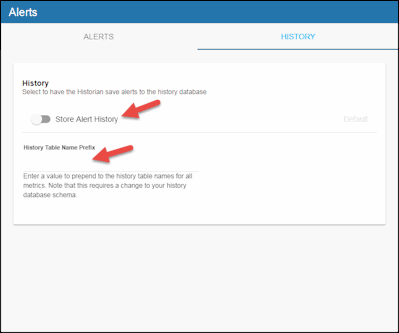
Storing Alert History
Enabling the Store Alert History option stores the alerts in the History database. This value is used in the Alerts Table (which makes it easier to find the alerts). See Configuring the Historian Database for more information.
To enable the Store Alert History option:
- Navigate to the RTView Configuration Application > Server Configuration > Alerts > History tab > History region.
- Select the Store Alert History toggle (blue is enabled, gray is disabled) to enable this option.
- You can also specify a History Table Name Prefix, which allows you to define a prefix that will be added to the database table names so that the Monitor can differentiate history data between data servers when you have multiple data servers with corresponding Historians using the same solution package(s) and database. In this case, each Historian needs to save to a different table, otherwise the corresponding data server will load metrics from both Historians on startup. Once you have defined the History Table Name Prefix, you will need to create the corresponding tables in your database as follows:
- Locate the .sql template for your database under rtvapm/(Solution Package Name)/dbconfig and make a copy of it
- Add the value you entered for the History Table Name Prefix to the beginning of all table names in the copied .sql template
- Use the copied .sql template to create the tables in your database
Saving Your Changes and Restarting the Data Server
Before your changes can take effect, you must save your changes and restart your data server. To do so:
- Click the SAVE button in the upper left hand corner of the window.

The  button displays in the upper right-hand corner of the window.
- Click the button to restart the data server.
Troubleshooting
If emails are not being sent, try the following troubleshooting steps:
- In the my_alert_actions.sh script, uncomment the ‘echo’ line
#echo "----- Alert command script executed: DOMAINNAME=$DOMAINNAME, ALERTNAME=$ALERTNAME, ALERTINDEX=$ALERTINDEX, ALERTTEXT=$ALERTTEXT, ALERTID=$ALERTID, ALERTSEVERITY=$ALERTSEVERITY #####"
- Check that the alerts are included in the dataserver.log file in /… projects/rtview-server/logs directory.
If you see entries in the log file such as:
“CmdOut for ./my_alert_actions.cleared.sh SL-SOLMON-1 +SolMsgRouterInboundByteRateHigh+ "+sgdemo+" +1269+ +1+ +High Warning Limit exceeded, current value: 45662.48734522234 limit: 1.0 - ----- Alert command script executed: DOMAINNAME=SL-SOLMON-1, ALERTNAME=SolMsgRouterInboundByteRateHigh, ALERTINDEX=sgdemo, ALERTTEXT=High Warning Limit exceeded, current value: 45662.48734522234 limit: 1.0, ALERTID=1269, ALERTSEVERITY=1 #####”
...then my_alert_actions.sh script is being executed.
If there are no entries in the log file, test that the script contains a valid command and a valid email destination.
Execute the command you created on the command line and make sure that the appropriate email notification was received. If not, then email alerts are not being received. Re-check your syntax and credentials and contact your email administrator.
If you see entries similar to the following in the dataserver.log:
CmdOut for ./my_alert_actions.sh SL-SOLMON-1 +SolMsgRouterInboundByteRateHigh+ "+solshare3+" +1386+ +1+ +High Warning Limit exceeded, current value: 50.28685457720129 limit: 1.0 - {
"id": "<20190227022659.1.E925C2FAE5F2C672@slsandbox.com>",
"message": "Queued. Thank you."
...then email alerts are being sent and you should contact your email administrator to understand why they are not being received.