Configuring the Historian Database for RTView Cloud, Version 5.0 (Optional)
Optionally, you can create a Historian Database connection that saves your incoming data to a database so that you can view your data metrics over a specified period of time in your various solution package displays. This document describes how to create the database connection as well as how to modify some additional historian default settings.
Before You Get Started
- You need to know the URL, driver, and classpath to be used for the historian database connection.
- If configured, you need to know Username/Password for your connection (if configured).
Defining and Historian Database Connection
Perform the following steps to create a Historian Database connection:
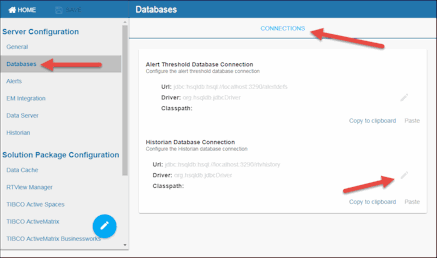
- Navigate to the RTView Configuration Application > Server Configuration > Databases > Connections tab.
The Edit Connection window displays.
Note: You can click on the Copy to clipboard and Paste links below the "edit box" prior to creating the connection to automatically include the default text into the window.
- Click the "edit box" inside the Alert Threshold Database Connection region.
The Edit Connection window displays.
Note: You can click on the Copy to clipboard and Paste links below the "edit box" prior to creating the connection to automatically include the default text into the window.
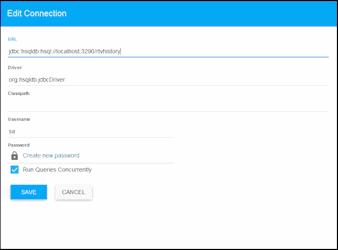
- Add the following connection details and click SAVE where:
URL: The complete URL for the database connection.
Driver: The full name for the driver.
Classpath: The complete classpath for the jar location.
Username: The username is used when creating the connection. This field is optional.
Password: This password is used when creating the connection. This field is optional. By default, the password entered is hidden. Click the ![]() icon to view the password text.
icon to view the password text.
Run Queries Concurrently: When selected, database queries are run concurrently.
Additional Historian Settings
You can also modify the default historian settings on the Historian tab for the following properties:
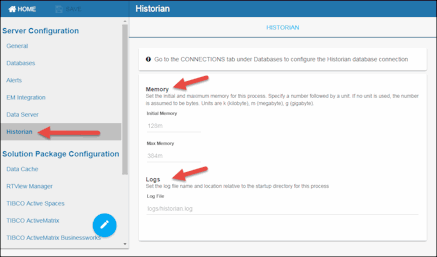
Memory: Sets the initial memory and maximum memory for the Historian process. Specify a number followed by a unit. Units are k (kilobyte), m (megabyte), g (gigabyte). If no unit is used, the number is assumed to be bytes.
Note: Use caution when you change the memory allocation. If the memory allocation is too small, the server might crash during startup and, if it is too large, the server might eventually exceed the available CPU/memory and fail.
Initial Memory: The initial amount of memory to allocate for this process.
Max Memory: The maximum amount of memory to allocate for this process.
Logs > Log File: The log file name and location relative to the startup directory for this process. In the Log File field, use the following format: <directory name>/<log file name>. For example, logs/historian.log.