Configuring the Historian Database for Enterprise Monitor (On-Premise), Version 5.0 (Optional)
Optionally, you can create a connection to a database that saves your incoming data so that you can view your data metrics over a specified period of time in your various solution package displays. You can use the default Historian database (HSQLDB) that is delivered with the DataServer, you can create a connection to RTView Central's Historian database, or you can create a connection to a (supported) database of your choice. This document describes how to set up your database as well as how to modify some additional Historian default settings.
Before You Get Started
- You need to know the URL, driver, and classpath to be used for the Historian database connection (if not using the default database). If you want to connect to RTView Central's historian database, you should know the connection properties that were used to connect to RTView Central's historian database.
- If configured, you need to know Username/Password for your connection (if configured).
Prerequisite Steps Required for Using the Historian Database
Regardless of which type of database you want to use, you must perform the following steps.
- Navigate to <default directory>/projects/rtview_server.
- Edit the rtvservers.dat file.
- Enable (remove #) from the following line to enable the historian:
default . historian runhist -ds
Enabling the Default Database (HSQLDB)
If you want to use the default database, perform the following steps:
- Navigate to <default directory>/projects/rtview_server.
- Edit the rtvservers.dat file.
- Enable (remove #) from the following line to use the default database:
default . database rundb
No further steps are needed. Your default database is ready to go.
Configuring the Connection to RTView Central's Historian Database
Perform the following steps to create the connection to RTView Central's Historian database:
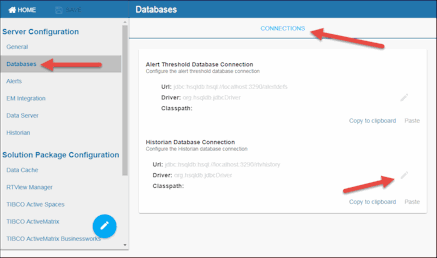
- Navigate to the RTView Configuration Application > Server Configuration > Databases > Connections tab.

- Click the "edit box" inside the Historian Database Connection region.
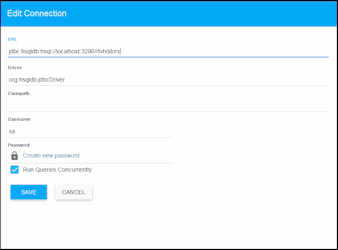
The Edit Connection window displays.
Note: You can click on the Copy to clipboard and Paste links below the "edit box" prior to creating the connection to automatically include the default text into the window.

- Using the connection information from RTView Central's Historian database, add (copy and paste) the following connection details and click SAVE where:
URL: The complete URL for RTView Central's database connection.
Driver: The full name for the driver.
Classpath: The complete classpath for the jar location.
Username: The username is used when creating the connection. This field is optional.
Password: This password is used when creating the connection. This field is optional. By default, the password entered is hidden. Click the ![]() icon to view the password text.
icon to view the password text.
Run Queries Concurrently: When selected, database queries are run concurrently.
Configuring Your Own Historian Database
If you do not want to use RTView Central's Historian database or the default/delivered database (HSQLDB), you can create a connection to your (supported) database. For this flow, you will need to install the database of your choice, configure the connections in the RTView Configuration Application, and you will have to manually create the required database tables. To define the connection:
- Install a database engine of your choice. Supported database engines are Oracle, Sybase, Microsoft SQL Server, MySQL, and DB2.
NOTE: The default page size of DB2 is 4k. However, you are required to create a DB2 database with a page size of 8k so that table indexes will function properly.
- Open the database.properties template file, which is located in the rtvapm\common\dbconfig directory, and find the line that corresponds to your supported database from the "Define the RTVHISTORY DB" section.
- Navigate to the RTView Configuration Application > Server Configuration > Databases > Connections tab.

- Click the "edit box" inside the Historian Database Connection region.
The Edit Connection window displays.
Note: You can click on the Copy to clipboard and Paste links below the "edit box" prior to creating the connection to automatically include the default text into the window.

- Enter the information from Step 2 into the Edit Connection dialog and click SAVE.
URL - Enter the full database URL to use when connecting to this database using the specified JDBC driver.
Driver - Enter the fully qualified name of the JDBC driver class to use when connecting to this database.
Classpath - Enter the location of the jar where the JDBC driver resides in your environment.
Username - Enter the username to enter into this database when making a connection.
Password - Enter the password to enter into this database when making a connection. If there is no password, use “-“.
Run Queries Concurrently - Select this check box to run database queries concurrently.
Click Save in the RTView Configuration Application and restart your data server.
- Manually create the necessary database tables.
To create tables for your database, use the .sql template files provided for each supported database platform, which is located in the dbconfig directory of the common, <solution package>, and rtvmgr directories:
rtvapm/<solution package>/dbconfig/create_<solution package>_history_tables_<db>.sql
rtvapm/rtvmgr/dbconfig/create_rtvmgr_history_tables_<db>.sql
where <db> ={db2, mysql, oracle, sqlserver, sybase}
NOTE: The standard SQL syntax is provided for each database, but requirements can vary depending on database configuration. If you require assistance, consult with your database administrator.
The most effective method to load the .sql files to create the database tables depends on your database and how the database is configured. Some possible mechanisms are:
Interactive SQL Tool
Some database applications provide an interface where you can directly type SQL commands. Copy/paste the contents of the appropriate .sql file into this tool.
Import Interface
Some database applications allow you to specify a .sql file containing SQL commands. You can use the .sql file for this purpose.
Before loading the .sql file, you should create the database and declare the database name in the command line of your SQL client. For example, on MySQL 5.5 Command Line Client, you should first create the database to create the tables for the Historian Settings:
create database myDBName;
Before loading the .sql file:
mysql -u myusername -mypassword myDBName < create_common_rtvhistory_tables_mysql.sql;
In some cases it might also be necessary to split each of the table creation statements in the .sql file into individual files.
Third Party Application
If your database does not have either of the two above capabilities, a third party tool can be used to enter SQL commands or import .sql files. Third party tools are available for connecting to a variety of databases (RazorSQL, SQLMaestro, Toad, for example).
Additional Historian Settings
You can also modify the default historian settings on the Historian tab for the following properties:
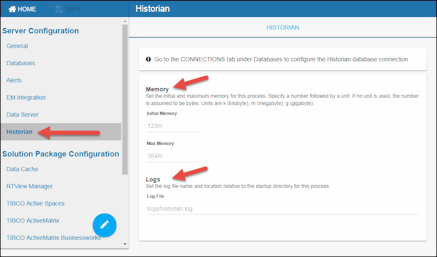
- Navigate to the Server Configuration > Historian > Historian tab.

- In the Memory region, enter the following, click SAVE, and restart your DataServer for your changes to go into effect:
Note: Use caution when you change the Initial Memory and Max Memory allocations. If the memory allocation is too small, the server might crash during startup and, if it is too large, the server might eventually exceed the available CPU/memory and fail.
Initial Memory: The initial amount of memory to allocate for this process. Specify a number followed by a unit. Units are k (kilobyte), m (megabyte), g (gigabyte). If no unit is used, the number is assumed to be bytes.
Max Memory: The maximum amount of memory to allocate for this process. Specify a number followed by a unit. Units are k (kilobyte), m (megabyte), g (gigabyte). If no unit is used, the number is assumed to be bytes.
Logs > Log File: The log file name and location relative to the startup directory for this process. In the Log File field, use the following format: <directory name>/<log file name>. For example, logs/historian.log.