RTView DataServer Quick Start Guide for Google Cloud Platform
This document describes how to create an RTView DataServer via the Google Cloud Platform for use with RTView Cloud. This document also provides an example of how to connect data sources to your data server and how to create a display that allows you to view your incoming data in RTView Cloud.
Before You Get Started
- You should have Node.js version 6 or higher and Java version 1.7 or higher installed on your local machine.
- For the RTView Cloud portion of this flow, you should perform the steps in your private organization in RTView Cloud.
Deploying the RTView DataServer
- Open a browser and type: https://console.cloud.google.com/marketplace
The Google Cloud Platform displays.
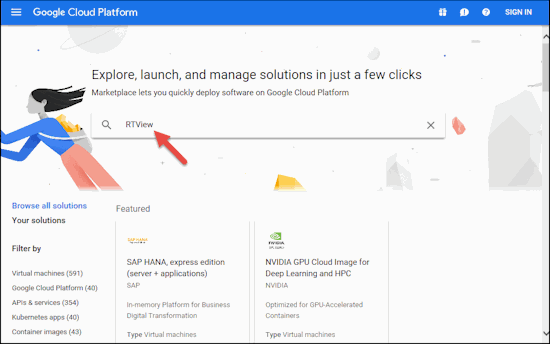
- Type RTView in the search box and click Enter/Return.
The Marketplace results page displays listing the RTView DataServer.
- Select RTView DataServer from the list of solutions.
The RTView-DataServer page displays.
- Click the LAUNCH ON COMPUTE ENGINE button.

The New RTView DataServer deployment page displays.
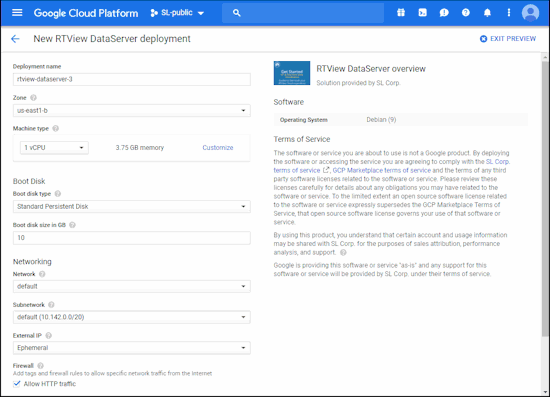
- Specify/select the desired values in the following fields, select the I accept the GCP Marketplace Terms of Service toggle, and click Deploy to deploy the RTView DataServer:
Deployment name: Specify the name for the data server deployment.
Zone: Select the region/zone in which your data will be stored and used.
Machine type: Select the desired "machine type" for your instance. Clicking and holding the drop down list displays the available machine types, which determine the amount of memory, virtual cores, and persistent disk limits for your instance. You can also click the associated Customize link to manually select a Cores/Memory combination.
Boot Disk
Boot disk type: Select from Standard Persistent Disk, which is less expensive, or SSD Persistent Disk, which is better for random IOPS or streaming throughput with low latency.
Boot disk size in GB: Specify the desired boot disk size (in gigabytes). Your cost will be based on the amount of provisioned disk space you select.
Networking
Network: Determines the network traffic the instance can access.
Subnetwork: Assigns the instance an iPV4 address from the subnetwork's range.
External IP: Specify an external IP address to be associated with this interface. Specify an unused static IP address or select Ephemeral to us an IP from a shared ephemeral IP address pool. Leaving this field blank will result in the interface having no external internet access.
Firewall
Allow HTTP traffic: Select this toggle to allow public access to your data server.
Source IP ranges for HTTP traffic: Specify a range of IP addresses that will be allowed access.
IP forwarding: Select On to allow the instance to help route packets.
- The Deployment Manager page displays showing the status of the RTView DataServer deployment.
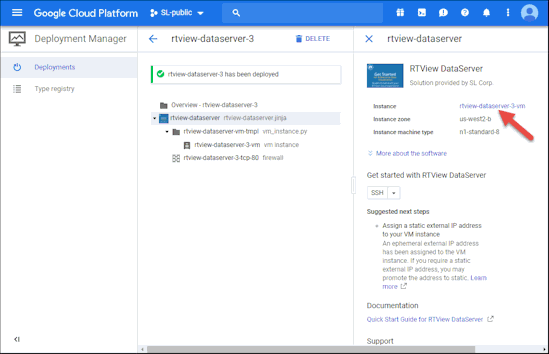
- Once deployment is complete, click the Instance name link (rtview-dataserver-3-vm in our example).
The Compute Engine page displays.
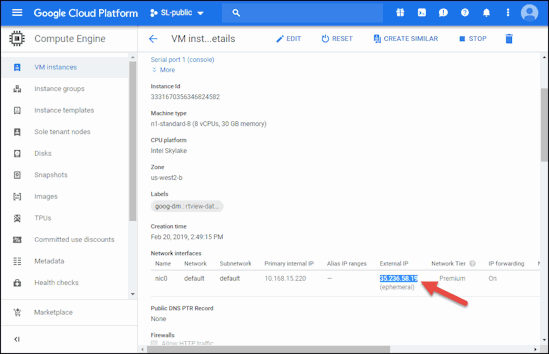
- Next, we want to verify that our data server is up and running. In the Network interfaces region on the Compute Engine page, find the External IP address and write it down or copy it (Ctrl-C). Remember this IP address for future reference.
- Open a new browser window and enter http://<IP address>/common (http://35.236.58.19/common in our example).
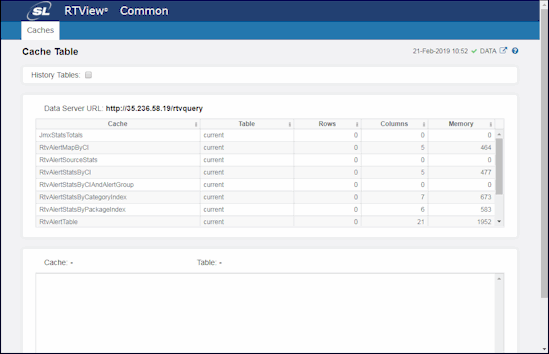
The RTView Common page displays listing the available caches on the data server.
Populating RTView DataServer Caches with Data
Next, you need to populate an RTView DataServer cache with data, which you can do by creating a script to pull the desired data from your data source into the RTView DataServer. The example in this section provides instructions and examples showing how to push real-time monitoring data from a JavaScript application into an instance of an RTView DataServer. Once data is pushed into the RTView DataServer, you can use RTView Cloud to create custom dashboards to display the data in real-time (which will be described in a following section). You can use the downloaded JavaScript example to give you a better idea of how to create your own scripts.
To access the example:
- Open a browser and navigate to: https://github.com/slcorp/RTView-Clearblade
![]()
- Click the Clone or download button, click Download ZIP, and save it to your machine.
- Extract/Unzip the file.
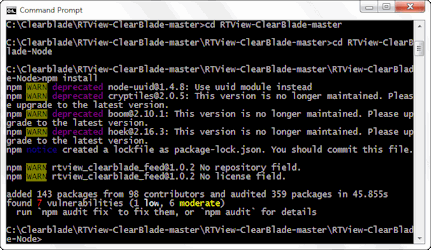
- Install the connector program by opening a command window, navigating to the install directory, and typing:
- cd RTView-ClearBlade-master\RTView-ClearBlade-master\RTView-ClearBlade-Node
- npm install (you must have Node.js version 6 or higher installed to run this program)
- Once installation has completed, open the rtview_clearblade_feed.js file (in the same directory) using a text editor.
![]()
The file opens in your editor.
![]()
- Edit the var target_url line in the file as below, and save your changes:
var target_url = "http://<IP address>/rtvpost" (in the example above, var target_url = "http://35.236.58.19/rtvpost")
- In the command window (and in the RTView-ClearBlade-master\RTView-ClearBlade-master\RTView-ClearBlade-Node directory), type the following:
node rtview_clearblade_feed.js
Data is pushed to the data server.
![]()
- Check the RTVIew Common (http://<IP address>/common) page again to verify that data is being pushed to your data server. You should see the ClearbladeCache in the list of caches.
![]()
Adding Your New Data Server to RTView Cloud
Before you can view your data in RTView Cloud, you need to add a connection to your data server via the Data tab in RTView Cloud. To add the data server connection:
Log in to your RTView Cloud account at http(s)://rtviewcloud.sl.com. If you do not have an RTView Cloud account, go to http(s)://rtviewcloud.sl.com/register and follow the instructions to create your account.
Note: If you log in using https, you must use https for your data server links as well. If you log in using http, you can use http or https for your data server links.
Once you have logged in, RTView Cloud displays.
- In RTView Cloud, click the Data tab at the top of the menu.
The RTData Server List page displays.

- Click the Add RTView Server button, specify the following, and then click Save Added Servers:

Name: Type the name you want to use for the server (TEST-GCP-DATASERVER for our example).
Host/URL: Enter the following: http://<IP address>/rtvquery
Shared: Toggle this option to share with other users in your organization.
Type: Select Data.
Authorization Type: Do not select an Authorization Type. Leave this option empty.
Once saved, the newly added server displays in the RTData Server List.
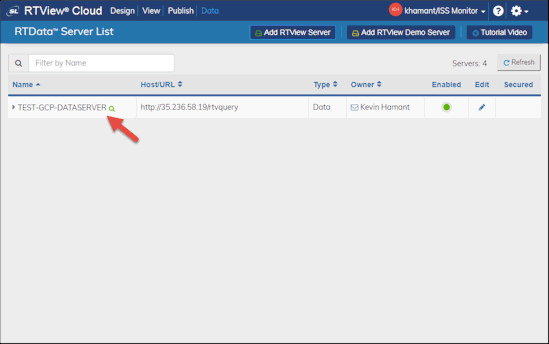
- Click on the green magnifying glass icon next to the TEST-GCP-DATASERVER entry.
The RTView DataServer - Cache Tables dialog displays.
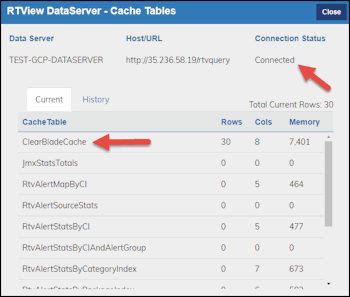
The Connection Status should be Connected and ClearBladeCache should display in the table.
- Click the Close button to close the dialog.
Creating a Display and Viewing Incoming Data
Next, you can view your incoming data by creating a display using the RTDraw Application (via the Design tab) in RTView Cloud. See Building Your First Display in RTView Cloud for more information. For our example, however, we will create a simple display. To do so:
- Click the Design tab in RTView Cloud.
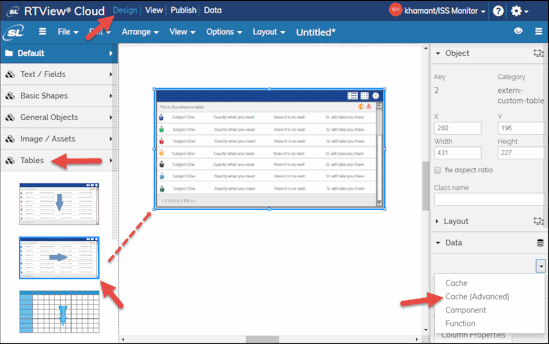
- Click Tables in the left menu, drag and drop the second table option into the main drawing window, and then select Cache (Advanced) from the drop down menu under the Data option in the right menu.
The ATTACH TO CACHE (ADVANCED) dialog displays.
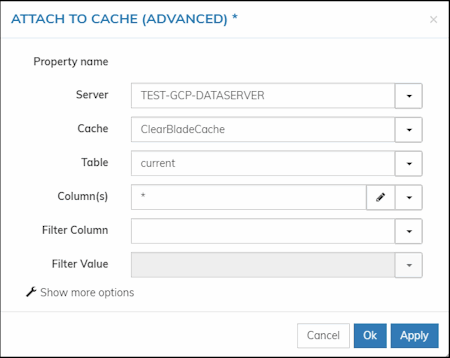
- Select your Server name (TEST-GCP-DATASERVER in our example), ClearBladeCache from the Cache drop down, current from the Table drop down, and * from the Column(s) drop down to display all the columns in the table.
The table in your display is populated with data from your server's ClearBladeCache.
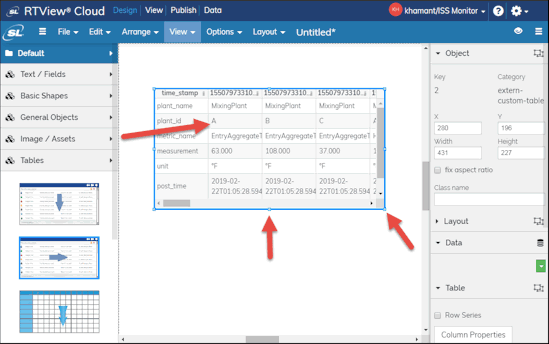
- You can resize the table by "grabbing" one of the blue "handles" on the edge of the table and dragging the edge. You can also use one of the options in the Text/Fields left menu to add a title and so on. Once completed with your changes, click File > Save As.
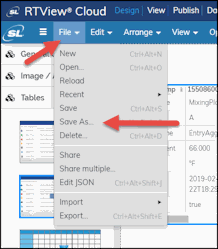
The SAVE AS dialog displays.

- Enter a Name for your display, and click Save file to save your display.
Your display is saved and the name of the display appears in the menu.

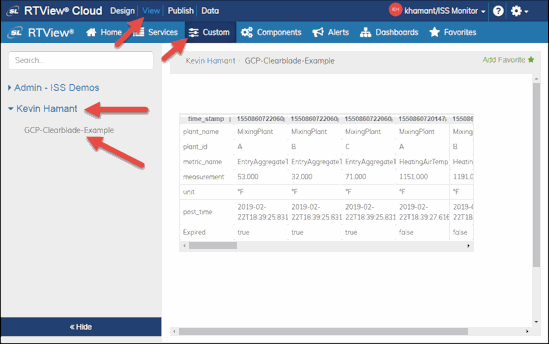
- You can view the working display (without having the ability to edit the display) by clicking the View tab > Custom > (User Name) > (Display Name)
See Building Your First Display in RTView Cloud for additional ways in which you can use RTDraw and RTView Cloud.