RTView DataServer for Solace Quick Start Guide (RTView Cloud), Version 5.1.1
This document describes how to download and install the RTView DataServer for Solace for use with RTView Cloud, how to configure the data server including defining the connection information for the Solution Package for Solace, how to add alert and historian database connections, how to add the solution package to RTView Cloud, and how to verify that your setup is working properly in RTView Cloud.
Note: If you are interested in setting up High Availability (failover) for your DataServer, review Configuring High Availability for DataServer Deliverables prior to starting this flow.
Note: In addition to using the RTView Configuration Application for configuring your connections, you can use the Property Editor REST API to import initial connections or automate connection updates. See Property Editor REST API for more information.
Before You Get Started
- You must have Java installed and you should know the installation directory path.
- You should know the correct full path to the directory containing the jar files for each of your solution packages.
- You should know the connection settings for your solution packages:
Solace connections: For message routers, know the SEMP Version of the message router(s), URL, and VPN (if defined).
Solace Cloud Event Brokers: You need to provide the exact SEMP version on each Solace Cloud Broker. Use the Solace Cloud console to get the value for the Solace Broker Version field, under Stats. The broker version aligns with the SEMP v1 version. You will use the first three digits, including any decimal points, of the value shown in the Solace Cloud Event Broker Solace Broker Version field, concatenated with this string: VMR. For example, if the value for the Solace Broker Version field is 9.1.1.1.0, you enter: 9.1.1VMR
- You should perform the following steps in your private organization in RTView Cloud.
- If you are upgrading to a new version of the DataServer, review the General Upgrade Steps document to see if there are any additional steps required. You should also review the upgrade steps for the Solution Package for Solace.
Downloading the RTView DataServer for Solace
Log in to your RTView Cloud account at http(s)://rtviewcloud.sl.com.
If you do not have an RTView Cloud account, go to http(s)://rtviewcloud.sl.com/register and follow the instructions to create your account.
Note: If you log in using https, you must use https for your data server links as well. If you log in using http, you can use http or https for your data server links.
Once you have logged in, RTView Cloud displays.
- Click the ? icon in the upper right corner.

The RTView Cloud Support Home page displays.
Click the Downloads button.
The RTView DataServer Downloads page displays.
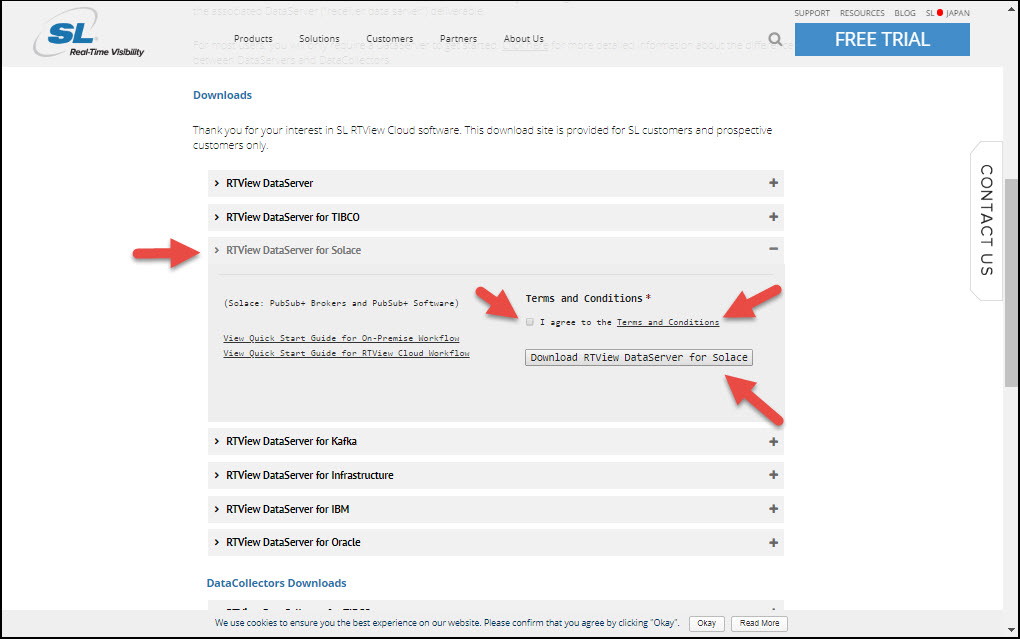
Scroll down to the RTView DataServer for Solace region and click the Terms and Conditions link to view the SL Corporation - End User License Agreement, click the I agree to the Terms and Conditions check box, and then click the Download RTView DataServer for Solace button.
The compressed file is saved to your machine.
Registration
When you install the DataServer, a temporary license key is included. SL Corporation will send you a permanent key that you will need to add to your RTView license key file so that you can extend the operation of your monitoring system.
This is a universal key that will enable you to run RTView on different machines and platforms. It is your responsibility to ensure you use RTView within the terms of your End User License Agreement (EULA).
To update your RTView system with your new license key, open a command window and:
- Navigate to RTViewDataServerSolace/rtvapm/rtview/lib.
- Edit the KEYS file using a text editor.
- Copy/paste the new replacement key to the file.
- Save the KEYS file.
Installing and Starting the RTView DataServer for Solace
Note: If using UNIX, do not include spaces in your installation directory path. The start_server.sh and stop_server.sh scripts will not function properly if spaces are included in the installation directory path.
Extract All (Windows)/unzip (UNIX/Linux) the file to the directory of your choice. For UNIX/Linux, use unzip -a to unzip the file.
Open a command window and set the JAVA_HOME environment variable to point to your Java Installation. For example:
export JAVA_HOME=/opt/Java/jdk1.7.0 (UNIX/Linux)
set JAVA_HOME=C:\Program Files (x86)\Java\jre1.8.0_201 (Windows)
Or, in Windows, you can set JAVA_HOME as an environment variable (in Control Panel > System > Advanced system settings), where it will then be used by all command windows and when you double-click on a .bat file.
- In the command window, navigate to the RTViewDataServerSolace directory and type:
start_server.bat (Windows)
./start_server.sh (UNIX/Linux)
Configuring the Data Server
Next, you need to create your connections for each of your solution packages using the RTView Configuration Application.
- Open a browser and type:
http://localhost:3270/rtvadmin (for a local installation using Eclipse Jetty)
http://<IP address>:3270/rtvadmin (for a remote installation using Eclipse Jetty)
Note: If you specified a different port at startup (due to a port conflict), you must use the port you specified in the command line. For example, if you specified 44 as your port prefix in the command line at startup, then you would use:
http(s)://<IP address>:4470/rtvadmin
The Authentication required dialog displays.
- Log in using rtvadmin/rtvadmin as the username/password.
The RTView Configuration Application displays.
- Click RTView DataServer for Solace.
The RTView Configuration Application displays with the General tab open.
- As previously mentioned, if you modified the port at startup, you should modify the port prefix so that you do not need to specify the port on the command line every time you run the startup script. To do so, navigate to Server Configuration > General > General Tab > Ports > Port Prefix and define a new port prefix. If you change the Port Prefix to 44 then, after saving your changes and restarting your data server, you would access the RTView Configuration Application for the RTView DataServer for Solace using the following URL: http(s)://localhost:4470/rtvadmin (instead of the default http(s)://localhost:3270/rtvadmin URL)
- Under Solution Package Configuration, select the desired solution package you want to configure and click the link below to view the steps required to set up the configuration for the solution package:
Data Cache: No configuration necessary.
- Optionally, you can create a Historian Database Connection and configure the historian settings, as well as create an Alert Threshold Database Connection and configure alerts. See the links below for more information:
Configuring the Historian Database (Optional)
Configuring Alerts (Optional)
Saving Your Changes and Restarting the Data Server
- Once you have created all of your connections, click the SAVE button in the RTView Configuration Application.

- For your changes to go into effect, you must stop and restart the data server by either:
- clicking the
 button (in the upper right-hand corner of the window)...
- clicking the
- or by typing the following in your installation directory in the command window:
stop_server.bat (Windows)
./stop_server.sh (UNIX/Linux)
start_server.bat (Windows)
./start_server.sh (UNIX/Linux)
Adding Solution Packages to RTView Cloud
Before you can access the data from the data server in RTView Cloud, you must "add" the desired solution packages to RTView Cloud.
Log in to your RTView Cloud account.
RTView Cloud displays.
- Click the cog wheel and select the Packages option.
The Solution Packages page displays.
- Click the Select Package button.
The Add Solution Package dialog displays.
- Scroll down and select the Add Package button next to Solace Message Router.
The selected Solace solution package is added to RTView Cloud.
Adding Your New Data Server to RTView Cloud
Before you can view data in RTView Cloud, you need to add a connection to your data server via the Data tab. To add the data server connection:
- Click the Data tab at the top of the menu.
The RTData Server List page displays.
- Click the Add RTView Server button, specify the following, and then click Save Added Servers:
Name: Type the name you want to use for the server (Solace-DATA-SERVER for our example).
Host/URL: Enter the following: http://localhost:3270/rtvquery for a local installation using Eclipse Jetty. You should use http://<IP address>:3270/rtvquery for a remote installation using Eclipse Jetty.
Type: Select Data.
Authorization Type: Do not select an Authorization Type. Leave this option empty.
Once saved, the newly added server displays in the RTData Server List.
Verifying Your Setup
To verify your setup:
- Click View > Components > Middleware > Solace Message Router and select your data server from the Data Server drop down list to view the incoming data.
- You can also check the incoming data in your caches by opening a browser and accessing the following URL:
http(s)://localhost:3270/common (for a local installation using Eclipse Jetty)
http(s)://<IP address>:3270/common (for a remote installation using Eclipse Jetty)
The RTView Cache Viewer application displays, which allows you to view the details for the caches that are collecting data.