Configuring TIBCO ActiveMatrix for DataCollector, Version 5.1.1
This section describes how to configure TIBCO ActiveMatrix so that you can collect the desired metrics, how to configure TIBCO Hawk so that you can collect TIBCO Hawk metrics, how to verify that TIBCO BusinessWorks (Version 5) Processes metrics are being collected, and how to modify default settings for the collection of TIBCO ActiveMatrix historical data.
Configuring Hawk for TIBCO ActiveMatrix
Some TIBCO ActiveMatrix metrics are derived from TIBCO Hawk Microagents installed by the TIBCO ActiveMatrix plugin. To collect these metrics, you must configure TIBCO Hawk.
Perform the following steps to configure Hawk:
Note: Only the Classpath and Connections regions on the CONNECTIONS tab need to be set up for TIBCO ActiveMatrix. The default settings on the DATA COLLECTION and DATA STORAGE tabs do not need to be modified.
- Navigate to the Solution Package Configuration > TIBCO Hawk > CONNECTIONS tab.
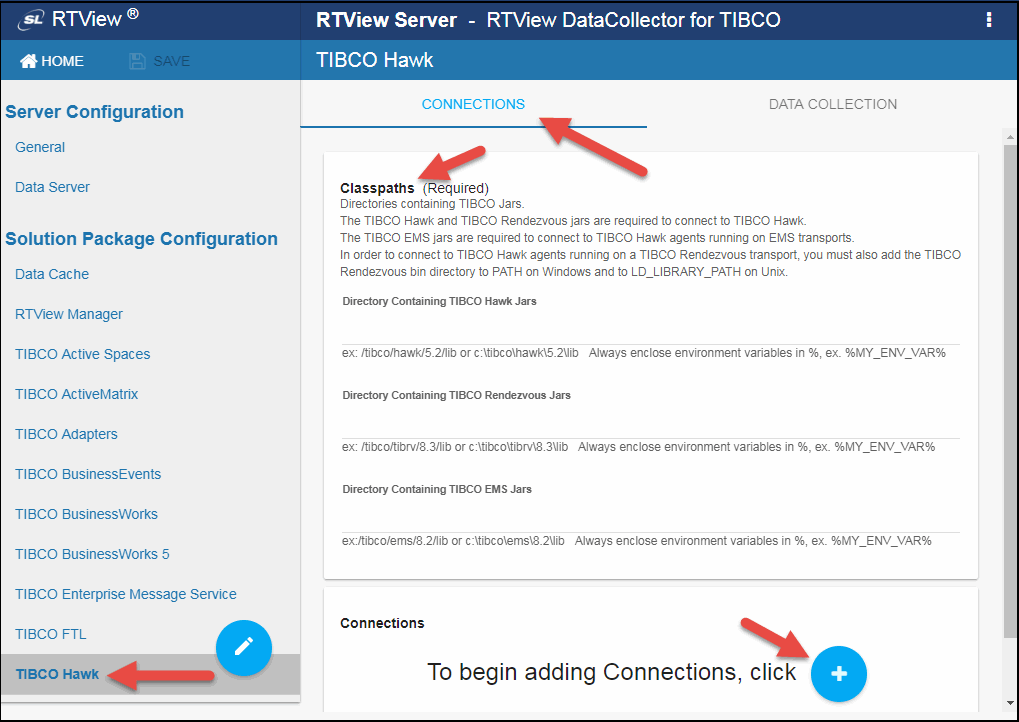
- In the CONNECTIONS tab, specify the classpaths for the TIBCO Hawk jar files, the TIBCO Rendezvous jar files, and the TIBCO EMS jar files.
- Click the
 icon.
icon.
The Add Connection dialog displays.
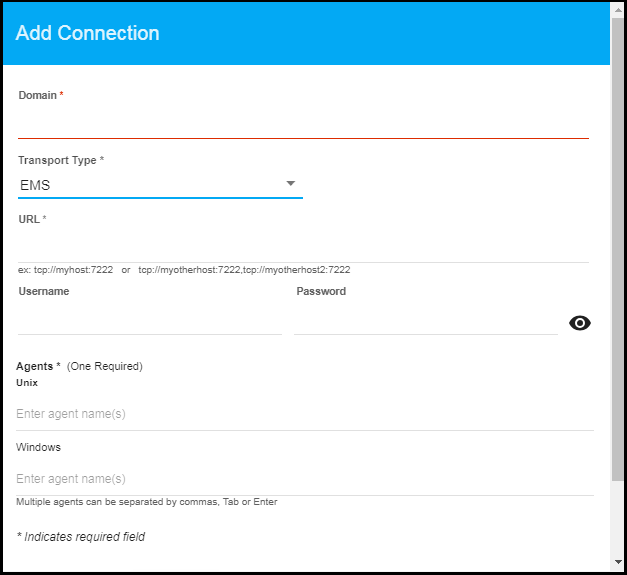
- For TIBCO Hawk domains running on EMS transports, specify the connection information and click SAVE where:
Domain: Enter the name of the domain.
Transport Type: Select EMS from this drop down list.
URL: Enter the complete URL for the EMS connection.
Username: The username is used when creating the EMS connection. This field is optional.
Password: This password is used when creating the EMS connection. This field is optional. By default, the password entered is hidden. Click the  icon to view the password text.
Agents: Enter the associated Unix/Windows agents. The agent name displays in the field after entering the name and typing a comma or by clicking the Tab or Enter key. You can enter more than one agent in the fields. Once the agent is specified, you can delete the agent by clicking the X next to their name.
- For TIBCO Hawk domains running on Rendezvous transports, specify the connection information and click SAVE where:
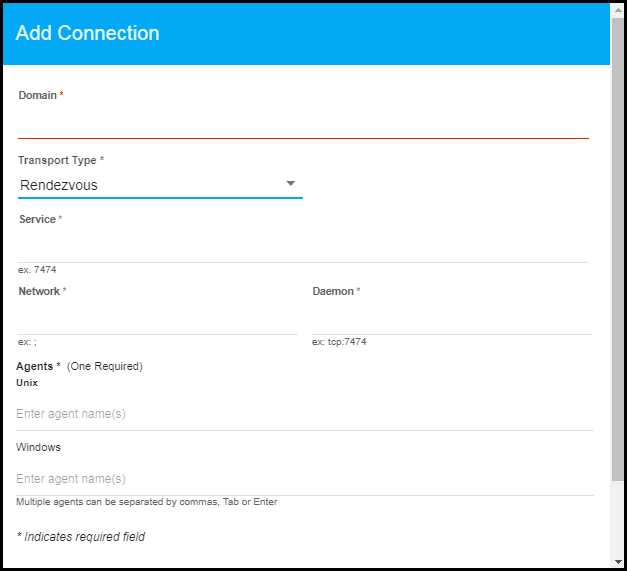
Domain: Enter the name of the domain.
Transport Type: Select Rendezvous from this drop down list.
Service: Enter the Service for the Rendezvous connection.
Network: Enter the Network for the Rendezvous connection.
Daemon: Enter the Daemon for the Rendezvous connection.
Agents: Enter the associated Unix/Windows agents. The agent name displays in the field after entering the name and typing a comma or by clicking the Tab or Enter key. You can enter more than one agent in the fields. Once the agent is specified, you can delete the agent by clicking the X next to their name.
Note: After you complete these configuration steps and start the RTView Data Server, you can verify your Hawk configuration by viewing the dataserver.log file, located in the logs directory.
- Click the SAVE button to save your changes in the RTView Configuration Application (upper left-hand corner).

The  displays in the upper right-hand corner.
- Stop and restart your project by clicking the
 button.
Verifying BW5 Processes Metrics are Collected
If your TIBCO ActiveMatrix configuration includes TIBCO BusinessWorks 5 engines, you need to verify that TIBCO BusinessWorks 5 processes are enabled so that you can collect metrics for the BW5 engines. To verify TIBCO BusinessWorks 5 processes are enabled:
- Navigate to the Solution Package Configuration > TIBCO BusinessWorks 5 > DATA COLLECTION tab.
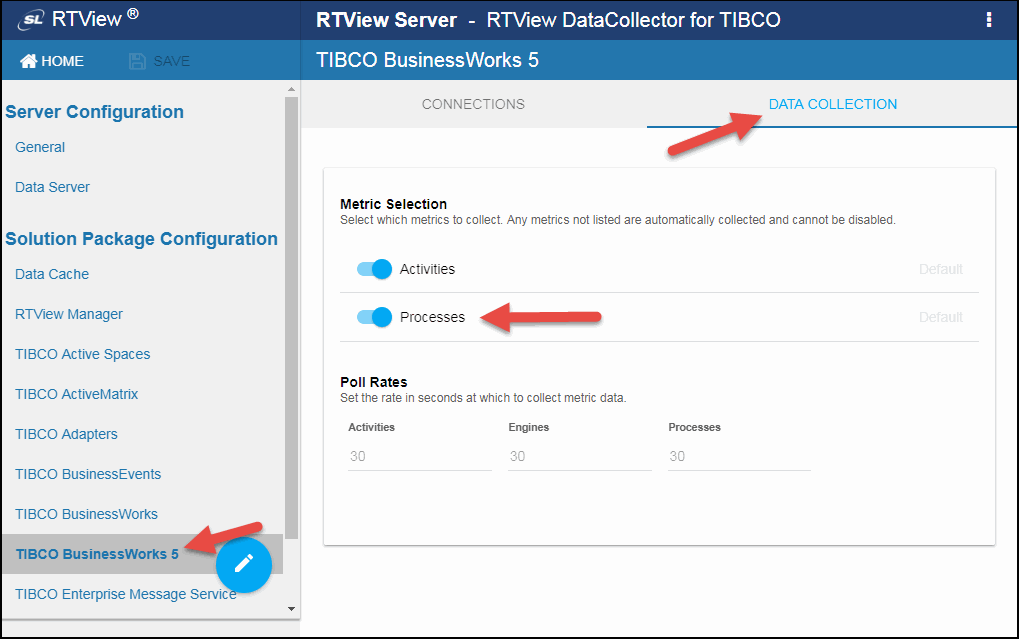
- Verify that the Processes toggle is enabled (blue for enabled, gray for disabled).
- SAVE your changes and restart the data server to enable your changes.
Configuring Data Collection for TIBCO ActiveMatrix
This section describes the steps required to create a connection to a TIBCO ActiveMatrix host.
Note: Some TIBCO ActiveMatrix metrics are derived from EMS messages queued on the TIBCO ActiveMatrix Admin server and, in order to access those messages, you must create a topic and a bridge to the queue in TIBCO ActiveMatrix and then create a connection (as described in the steps below) for each TIBCO ActiveMatrix host.
Queue: amx.governance.stats
Topic: rtv.amx.governance.stats
- Navigate to the Solution Package Configuration > TIBCO ActiveMatrix > CONNECTIONS tab.
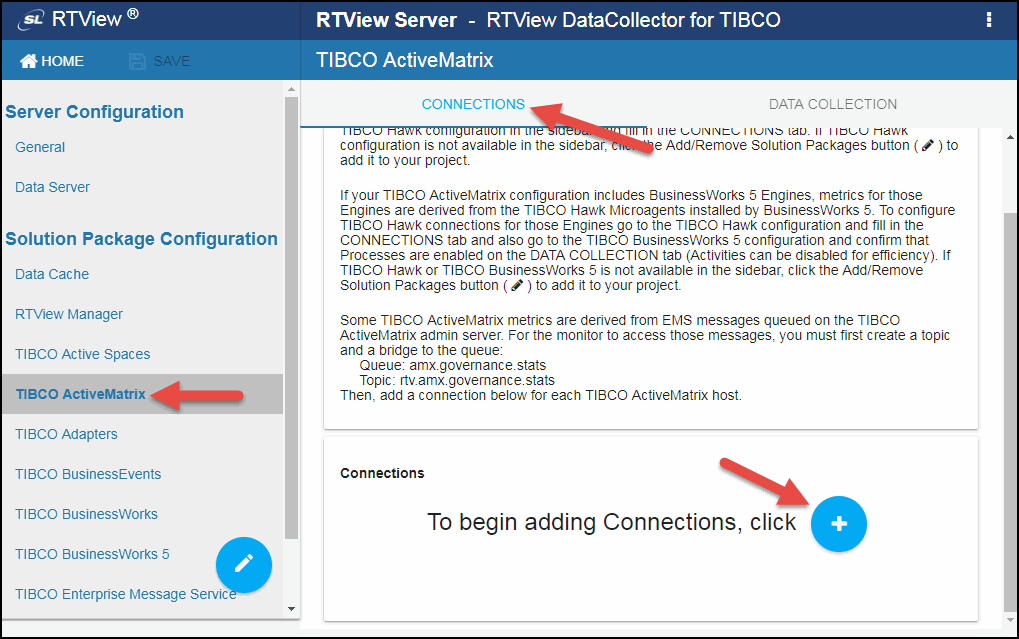
- Click the
 icon.
icon.
The Add Connection dialog displays.
- Specify the connection information and click SAVE where:
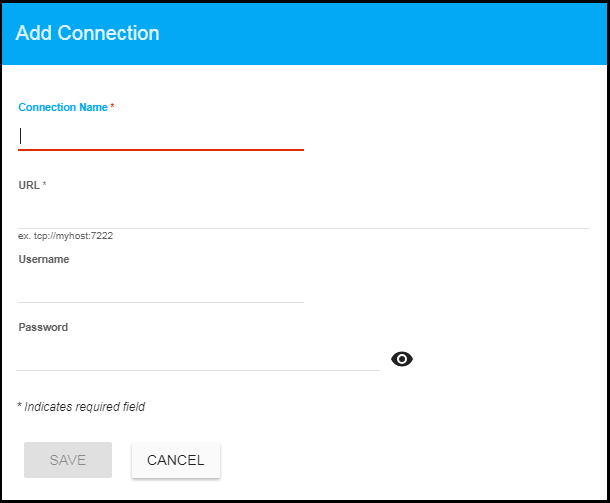
Connection Name: Enter the name of the connection.
URL: Enter the complete URL for the connection.
Username: The username is used when creating the connection. This field is optional.
Password: This password is used when creating the connection. This field is optional. By default, the password entered is hidden. Click the icon to view the password text.
- If you want to modify the default values for the update rates for the TIBCO ActiveMatrix caches, you can update the default polling rates in Solution Package Configuration > TIBCO ActiveMatrix > DATA COLLECTION > Poll Rates.
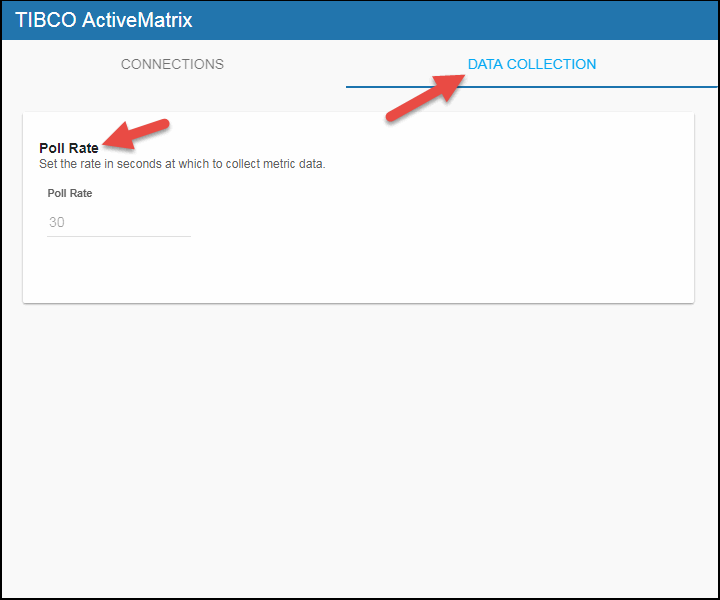
- Modify the value for the Poll Rate field to modify the default polling rate for the _AmxNodeInfo, _AmxNodeComponentstats, _AmxNodeBindingstats, _AmxNodeComponents, and _AmxServiceNodes caches.