Configuring Solution Package for Solace, Version 5.0
Kevin Hamant (Unlicensed)
This section describes the required configurations as well as the optional configurations available for the Solution Package for Solace in the RTView Configuration Application. You must define data source connections for each message router and Syslog connection that you want to monitor on the CONNECTIONS tab. You can also optionally modify the default data update rates and historical data collection configurations on the DATA COLLECTION and DATA STORAGE tabs.
Obtain SEMP Version
In order to properly request monitored data, the Monitor requires the exact SEMP version on your message routers. These instructions describe how to use SolAdmin to determine the SEMP version for each of your Solace Message Routers or VMRs. You will need this information when you connect your message routers and edit connection properties.
Note: These instructions are for SolAdmin on Windows. For Linux, only the path to the log file changes.
To obtain the SEMP Version"
- Navigate to the SolAdmin installation folder. For example, C:\Program Files (x86)\SolAdmin\.
- Change directory (cd) to the bin directory and open the log4j.properties file in a text editor.
- Change the logging level to DEBUG and provide the full path to the logging file (for example, C:\Logs) while retaining all other settings. The edited properties are as follows:
# full path to the location where you want the log file to be stored. In this example C:\Logs
log4j.appender.A1.File=C:\Logs\soladmin.log
# Set the logging category to DEBUG
log4j.category.com.solacesystems=DEBUG, A1
- Save the log4j.properties file.
- Start SolAdmin and add your message routers or VMRs as managed instances.
- Open the soladmin.log file and locate the semp-version tag in SEMP requests. The SEMP version that will be used by the Monitor replaces underscores (_) with dots (.). For example, if the SEMP request in the SolAdmin log file is 7_2VMR, you use 7.2VMR for the $solSempVersion substitution of the Monitor connection property.
Configuring Data Collection
To configure data collection:
- Navigate to the Solution Package Configuration > Solace > CONNECTIONS tab.
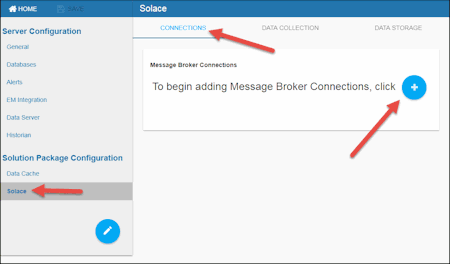
- To create connections to your message routers, click the MESSAGE ROUTER button on the CONNECTIONS tab and click the
 icon.
icon.
The Add Connection dialog displays.
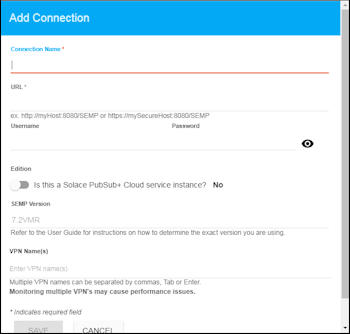
- Specify the connection information and click SAVE where:
Connection Name: Enter a unique string to identify the connection of the monitored message router.
URL: Enter the URL to be used for the connection, which contains an IP address or the host name that can be resolved by your network name resolution method and the SEMP port number configured for your message router.
Username: The username is used when creating the connection to the message router. This field is only required when the connection has been secured.
Password: This password is used when creating the connection to the message router. This field is only required when the connection has been secured. By default, the password entered is hidden. Click the ![]() icon to view the password text.
icon to view the password text.
Edition: Enable the toggle if the connection is a Solace PubSub+ Cloud service instance.
SEMP Version: Specify the SEMP Version used by the connection.
VPN Name(s): Optionally enter the names of the VPNs that you want to monitor. Monitoring multiple VPNs could impact performance.
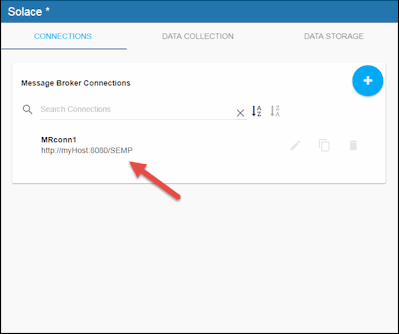
Once saved, your newly saved message router connection displays in the Message Broker Connections region on the CONNECTIONS tab.
- If you want to modify the default values for the update rates for all caches, you can update the default polling rates in Solution Package Configuration > Solace > DATA COLLECTION > Poll Rates.
Note: When modifying your update rates, you should take your system architecture and number of elements per cache into account and ensure that you are not changing your update rates to values that might negatively impact system performance.
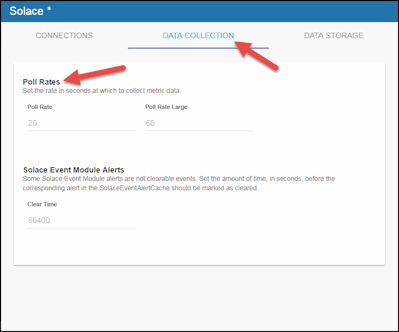
The following options are available:
Poll Rate: Enter the query interval, in seconds, to collect data updates. Caches impacted by this field are SolEndpointStats, SolEndpoints, SolClients, SolClientStats, SolBridges, SolAppliances, SolBridgeStats, SolApplianceInterfaces and SolApplianceMessageSpool.
Poll Rate Large: Enter the time interval, in seconds, to check for data updates. Caches impacted by this field are SolCspfNeighbors, SolApplicances and SolEnvironmentSensors.
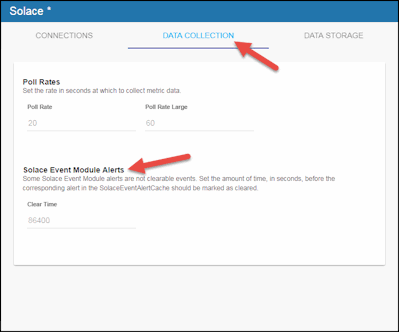
- If you want to modify the default value for the time in which alerts in the SolaceEventAlertCache are cleared, you can update the default value in the Clear Time field in Solution Package Configuration > Solace > DATA COLLECTION > Solace Event Module Alerts.
Configuring Collection of Historical Data (Optional)
You can specify the number of history rows to store in memory, the compaction rules, the duration before metrics are expired and deleted, and the different types of metrics that you want the Historian to store in the DATA STORAGE tab in the RTView Configuration Application. This section is optional.
Defining the Storage of In Memory History
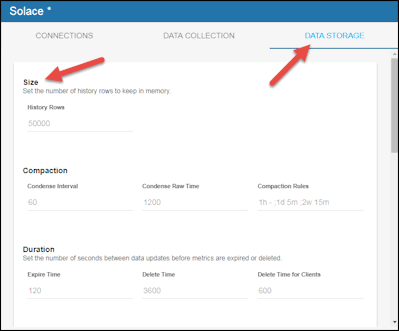
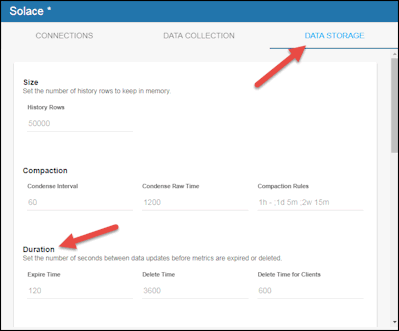
You can modify the maximum number of history rows to store in memory in the DATA STORAGE tab. The History Rows property defines the maximum number of rows to store for the SolVpns, SolClientStats, SolAppliances, SolEndpoints, SolCspfNeighbors, SolBridgeStats, SolApplianceInterfaces, SolApplianceMessageSpool, SolEndpointStats, and SolAppliancesQuality. caches. The default setting for History Rows is 50,000. To update the default settings:
- Navigate to the Solution Package Configuration > Solace > DATA STORAGE tab.
- In the Size region, click the History Rows field and specify the desired number of rows.
Defining Compaction Rules
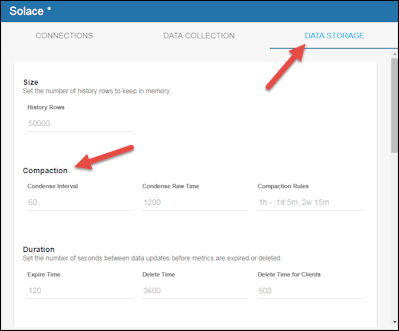
Data compaction, essentially, is taking large quantities of data and condensing it using a defined rule so that you store a reasonably sized sample of data instead of all of your data, thus preventing you from potentially overloading your database. The available fields are:
Condense Interval -- The time interval at which the cache history is condensed for the following caches: SolVpns, SolClientStats, SolAppliances, SolEndpoints, SolCspfNeighbors, SolBridgeStats, SolApplianceInterfaces, SolApplianceMessageSpool, and SolEndpointStatscaches.. The default is 60 seconds.
Condense Raw Time -- The time span of raw data kept in the cache history table for the following caches: SolVpns, SolClientStats, SolAppliances, SolEndpoints, SolCspfNeighbors, SolBridgeStats, SolApplianceInterfaces, SolApplianceMessageSpool, and SolEndpointStats. The default is 1200 seconds.
Compaction Rules -- This field defines the rules used to condense your historical data in the database for the following caches: SolVpns, SolClientStats, SolAppliances, SolEndpoints, SolCspfNeighbors, SolBridgeStats, SolApplianceInterfaces, SolApplianceMessageSpool, and SolEndpointStats. By default, the columns kept in history will be aggregated by averaging rows with the following rule 1h -;1d 5m;2w 15m, which means the data from 1 hour will not be aggregated (1h - rule), the data over a period of 1 day will be aggregated every 5 minutes (1d 5m rule), and the data over a period of 2 weeks old will be aggregated every 15 minutes (2w 15m rule).
To modify these settings:
- Navigate to the Solution Package Configuration > Solace > DATA STORAGE tab.
- In the Compaction region, click the Condense Interval, Condense Raw Time, and Compaction Rules fields and specify the desired settings.
Note: When you click in the Compaction Rules field, the Copy default text to clipboard link appears, which allows you copy the default text (that appears in the field) and paste it into the field. This allows you to easily edit the string rather than creating the string from scratch.
Defining Expiration and Deletion Duration Metrics
The data for each metric is stored in a specific cache and, when the data is not updated in a certain period of time, that data will either be marked as expired or, if it has not been updated for an extended period of time, it will be deleted from the cache altogether. The following fields are available:
Expire Time - The number of seconds to wait for a data update before cached history data is shown as Expired in displays. The caches impacted by this field are SolVpns, SolBridges, SolClients, SolClientStats, SolAppliances, SolEndpoints, SolCspfNeighbors, SolBridgeStats, SolApplianceInterfaces, SolApplianceMessageSpool, SolEndpointStats, SolEnvironmentSensors and SolAppliancesQuality.
Delete Time - The number of seconds to wait for a data update before cached history data is removed from displays. The caches impacted by this field are SolVpns, SolBridges, SolEndpoints, SolBridgeStats, SolEndpointStats and SolEnvironmentSensors.
Delete Time for Clients - The number of seconds to wait for a response from clients before removing client from displays. The caches impacted by this field are SolClients and SolClientStats.
To modify these defaults:
- Navigate to the Solution Package Configuration > Solace > DATA STORAGE tab.
- In the Duration region, click the Expire Time, Delete Time, and Delete Time for Clients fields and specify the desired settings.
Enabling/Disabling Storage of Historical Data
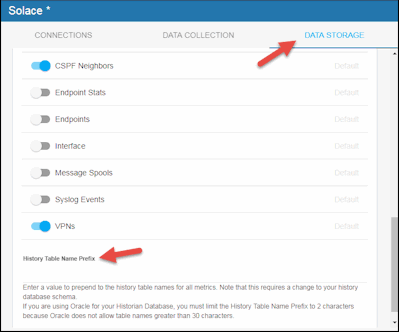
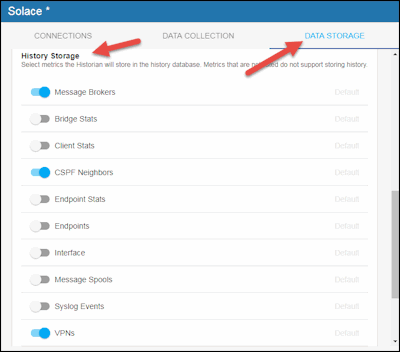
The History Storage section allows you to select which metrics you want the Historian to store in the history database. By default, the following historical data is saved to the database: Message Routers (SolAppliances cache), CSPF Neighbors (SolCspfNeighbors cache), and VPNs (SolVpns cache). The remaining historical data is not saved to the database by default (Bridge Stats (SolBridgeStats cache), Client Stats (SolClientStats cache), Endpoint Stats (SolEndpointStats cache), Endpoints (SolEndpoints cache), Interface (SolApplianceInterfaces cache), Message Spools (SolApplianceMessageSpool cache), Syslog Events (SyslogEvents cache)). To enable/disable the collection of historical data, perform the following steps:
- Navigate to the Solution Package Configuration > Solace > DATA STORAGE tab.
- In the History Storage region, (de)select the toggles for the various metrics that you (do not) want to collect. Blue is enabled, gray is disabled.
Defining a Prefix for All History Table Names for Metrics
The History Table Name Prefix field allows you to define a prefix that will be added to the database table names so that the Monitor can differentiate history data between data servers when you have multiple data servers with corresponding Historians using the same solution package(s) and database. In this case, each Historian needs to save to a different table, otherwise the corresponding data server will load metrics from both Historians on startup. Once you have defined the History Table Name Prefix, you will need to create the corresponding tables in your database as follows:
- Locate the .sql template for your database under rtvapm/solmon/dbconfig and make a copy of the template.
- Add the value you entered for the History Table Name Prefix to the beginning of all table names in the copied .sql template.
- Use the copied .sql template to create the tables in your database.
Note: If you are using Oracle for your Historian Database, you must limit the History Table Name Prefix to 2 characters because Oracle does not allow table names greater than 30 characters (and the longest table name for the solution package is 28 characters).
To add the prefix:
- Navigate to the Solution Package Configuration > Solace > DATA STORAGE tab.
- Click on the History Table Name Prefix field and enter the desired prefix name.
