RTView Data Server for Kafka Quick Start Guide, Version 4.2
This document describes how to download and install the RTView DataServer for Kafka for use with RTView Cloud, how to configure the data server including defining the connection information, (optionally) how to add alert and historian database connections, how to add your solution package to RTView Cloud, and how to verify that your setup is working properly in RTView Cloud.
Before You Get Started
- You must have Java installed and you should know the installation directory path.
- You should know the correct full path to the directory containing the Apache Kafka jar files.
- You should know the settings for your Zookeeper connections: Client Port, Host, JMX Port, Username/Password, and Cluster Name.
- You should know the settings for your Broker connections: Client Port, Host, JMX Port, Username/Password, Cluster Name, and Topic Names.
- You should know the settings for your Producer connections: Host, JMX Port, Username/Password, and Cluster Name.
- You should know the settings for your Consumer connections: Host, JMX Port, Username/Password, and Cluster Name.
- You should perform the following steps in your private organization in RTView Cloud.
Downloading the RTView DataServer for Kafka
Log in to your RTView Cloud account at http(s)://rtviewcloud.sl.com.
If you do not have an RTView Cloud account, go to http(s)://rtviewcloud.sl.com/register and follow the instructions to create your account.
Note: If you log in using https, you must use https for your data server links as well. If you log in using http, you can use http or https for your data server links.
Once you have logged in, RTView Cloud displays.
- Click the ? icon in the upper right corner.

The RTView Cloud Support Home page displays.
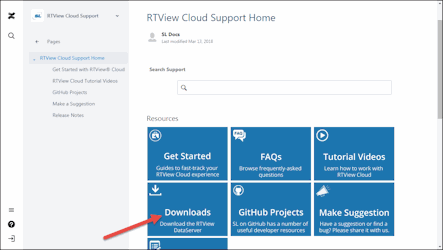
Click the Downloads button.
The RTView Cloud Downloads page displays.
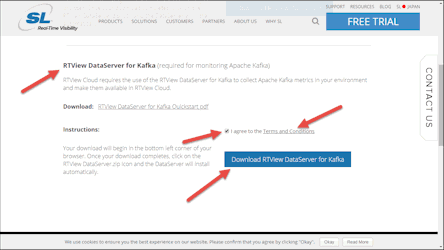
Scroll down to the RTView DataServer for Kafka region and click the Terms and Conditions link to view the SL Corporation - End User License Agreement, click the I agree to the Terms and Conditions check box, and then click the Download RTView DataServer Kafka button.
The RTView Cloud – Dataserver for Kafka Download page displays.
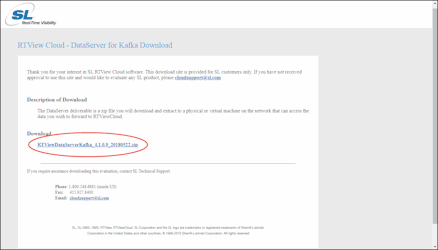
Click the RTViewDataServerKafka_<version>.zip file.
The compressed file is saved to your machine.
Installing and Starting the RTView DataServer for Kafka
Extract All (Windows)/unzip (UNIX/Linux) the file to the directory of your choice. For UNIX/Linux, use unzip -a to unzip the file.
Open a command window and set the JAVA_HOME environment variable to point to your Java Installation. For example:
export JAVA_HOME=/opt/Java/jdk1.7.0 (UNIX/Linux)
set JAVA_HOME=/opt/Java/jdk1.7.0 (Windows)
Or, in Windows, you can set JAVA_HOME as an environment variable (in Control Panel > System > Advanced system settings), where it will then be used by all command windows and when you double-click on a .bat file.
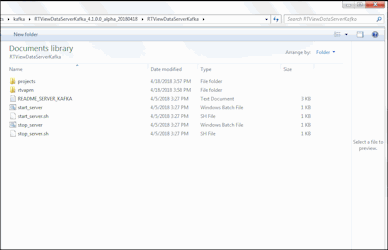
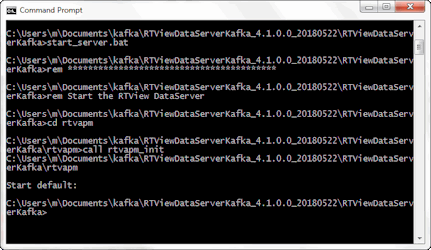
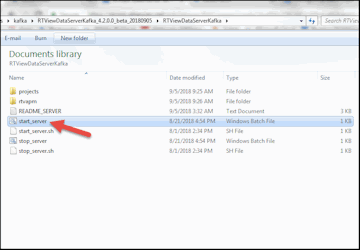
- In the command window, navigate to the RTViewDataServerKafka directory and type:
start_server.bat (Windows)
./start_server.sh (UNIX/Linux)
Or:
In Windows, you can double-click on start_server (Windows Batch File) in the RTViewDataServerKafka directory.
Configuring the DataServer
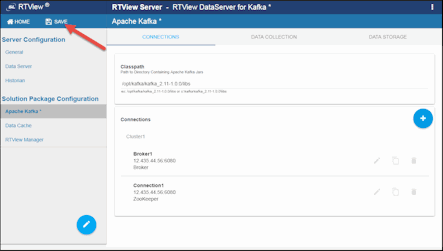
Next, you need to specify the directory path to your Apache Kafka .jar files and you need to create your connections using the RTView Configuration Application.
- Open a browser and type:
http(s)://localhost:3270/rtvadmin (for a local installation using Eclipse Jetty)
http(s)://<IP address>:3270/rtvadmin (for a remote installation using Eclipse Jetty)
Note: If you specified a different port at startup (due to a port conflict), you must use the port you specified in the command line. For example, if you specified 44 as your port prefix in the command line at startup, then you would use:
http(s)://<IP address>:4470/rtvadmin
The Authentication required dialog displays.
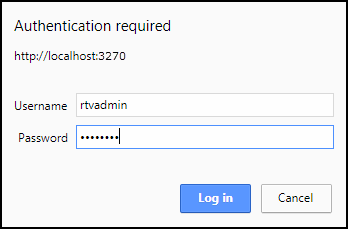
- Log in using rtvadmin/rtvadmin as the username/password.
The RTView Configuration Application displays.
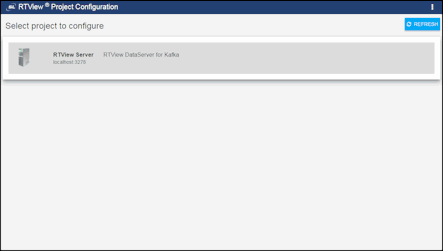
- Click RTView DataServer for Kafka.
The RTView Configuration Application displays with the General tab open.
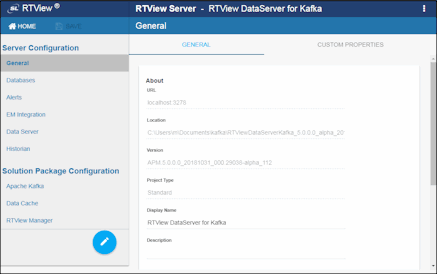
- As previously mentioned, if you modified the port at startup, you should modify the port prefix so that you do not need to specify the port on the command line every time you run the startup script. To do so, navigate to Server Configuration > General > General Tab > Ports > Port Prefixand define a new port prefix. If you change the Port Prefix to 44 then, after saving your changes and restarting your data server, you would access the RTView Configuration Application for the RTView DataServer for Kafka using the following URL: http(s)://localhost:4470/rtvadmin (instead of the default http(s)://localhost:3270/rtvadmin URL)

- Under Solution Package Configuration, select the desired solution package you want to configure and click the link below to view the steps required to set up the configuration for the solution package:
Data Cache: No configuration required.
RTView Manager: No configuration required.
- Optionally, you can create a Historian Database Connection and configure the historian settings, as well as create an Alert Threshold Database Connection and configure alerts. See the links below for more information:
Configuring the Historian Database (Optional)
Configuring Alerts (Optional)
Saving Your Changes and Restarting the Data Server
- Once you have created all of your connections, click the SAVE button in the RTView Configuration Application.
- For your changes to go into effect, you must stop and restart the dataserver from your installation directory by typing the following in your command window:
stop_server.bat (Windows)
./stop_server.sh (UNIX/Linux)
start_server.bat (Windows)
./start_server.sh (UNIX/Linux)
Or:
Click the RESTART DATASERVER button in the upper right-hand corner.

Adding Solution Packages to RTView Cloud
Before you can access the data from the data server in RTView Cloud, you must "add" the desired solution packages to RTView Cloud.
- Log in to your RTView Cloud account at http(s)://rtviewcloud.sl.com (if you are not already logged in).
RTView Cloud displays.
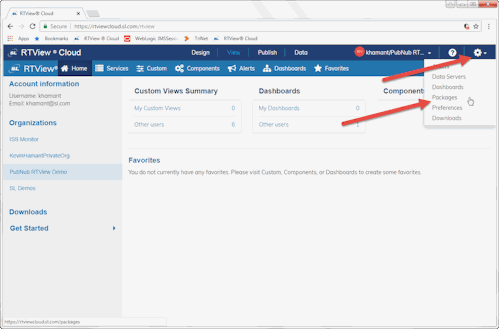
- Click the cog wheel and select the Packages option.
The Solution Packages page displays.
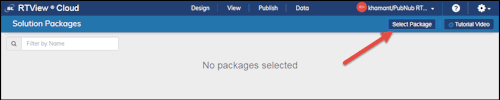
- Click the Select Package button.
The Add Solution Package dialog displays.
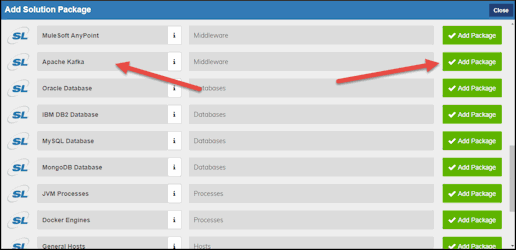
- Scroll down and select the Add Package button next to the Apache Kafka option, and then continue selecting desired solution packages.
The selected solution packages are added to RTView Cloud.

Adding Your New Data Server to RTView Cloud
Before you can view data in RTView Cloud, you need to add your data server via the Data tab. To add the data server:
- Click the Data tab at the top of the menu.
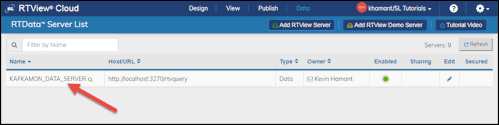
The RTData Server List page displays.
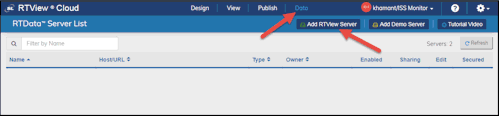
- Click the Add RTView Server button, specify the following, and then click Save Added Servers:
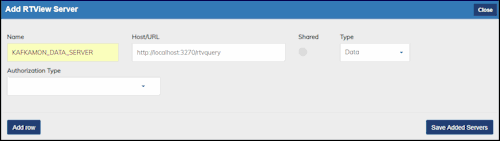
Name: Type the name you want to use for the server.
Host/URL: Enter the following: http://localhost:3270/rtvquery for a local installation using Eclipse Jetty, or use http://<IP address>:3270/rtvquery for a remote installation using Eclipse Jetty.
Type: Select Data.
Authorization Type: Do not select an Authorization Type. Leave this option empty.
Once saved, the newly added server displays in the RTData Server List.
Verifying Your Setup
To verify your setup:
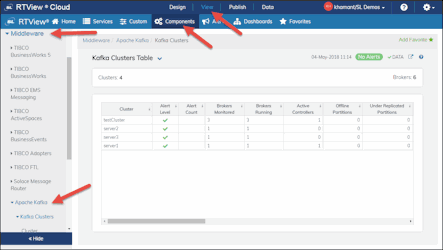
- Click View > Components > Middleware > Apache Kafka to view the incoming data.
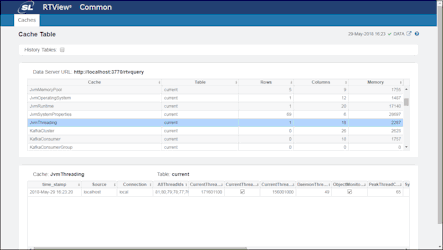
- Once you have set up your connections for your data server, you can verify your setup by accessing the following URL:
http(s)://localhost:3270/common (for a local installation using Eclipse Jetty)
http(s)://<IP address>:3270/common (for a remote installation using Eclipse Jetty)
The RTView Cache Viewer application displays, which allows you to view the details for the caches that are collecting data.